I am Joanna, an engineering manager turned Interior Designer and Founder.
My name is Joanna Chan. Born in Hong Kong, I got my Bachelor of Science - Computer Engineering degree at the University of Waterloo, Toronto, Canada. For years, I worked in the tech industry as a software engineer and later became an engineering manager. Four years ago, I decided to pursue my passion for design. I got a design internship at an interior design company, and one year later, I started my own interior design firm called Harmony Interior.
In the next five years, my goal is to design for retail and commercial spaces. I want to have my own brand of furnitures and furnishings. I believe that designs should not only have the best aesthetics and functions, but more importantly, it should improve the wellbeing of its people and the environment.
My Design Principles

My Design Process
I will take you through my design process using a home addition project I have completed, from client questionnaire to project finish photos. In one part of this project, I designed a new layout for a master bedroom with a new bathroom, a new bay window and reading nook area.
1 - Questionnaire
To properly represent my clients, I first understand their lifestyle, aesthetic preferences, colors, budget, project expectations, scope, etc. Along the project, I always take note of their feedback/likes/dislikes as these help me understand them as a family, not just my clients.

3 - Rendering
Once design sketch is selected, I create 3D rendering of the new design so that my client have a better visualization of the new space
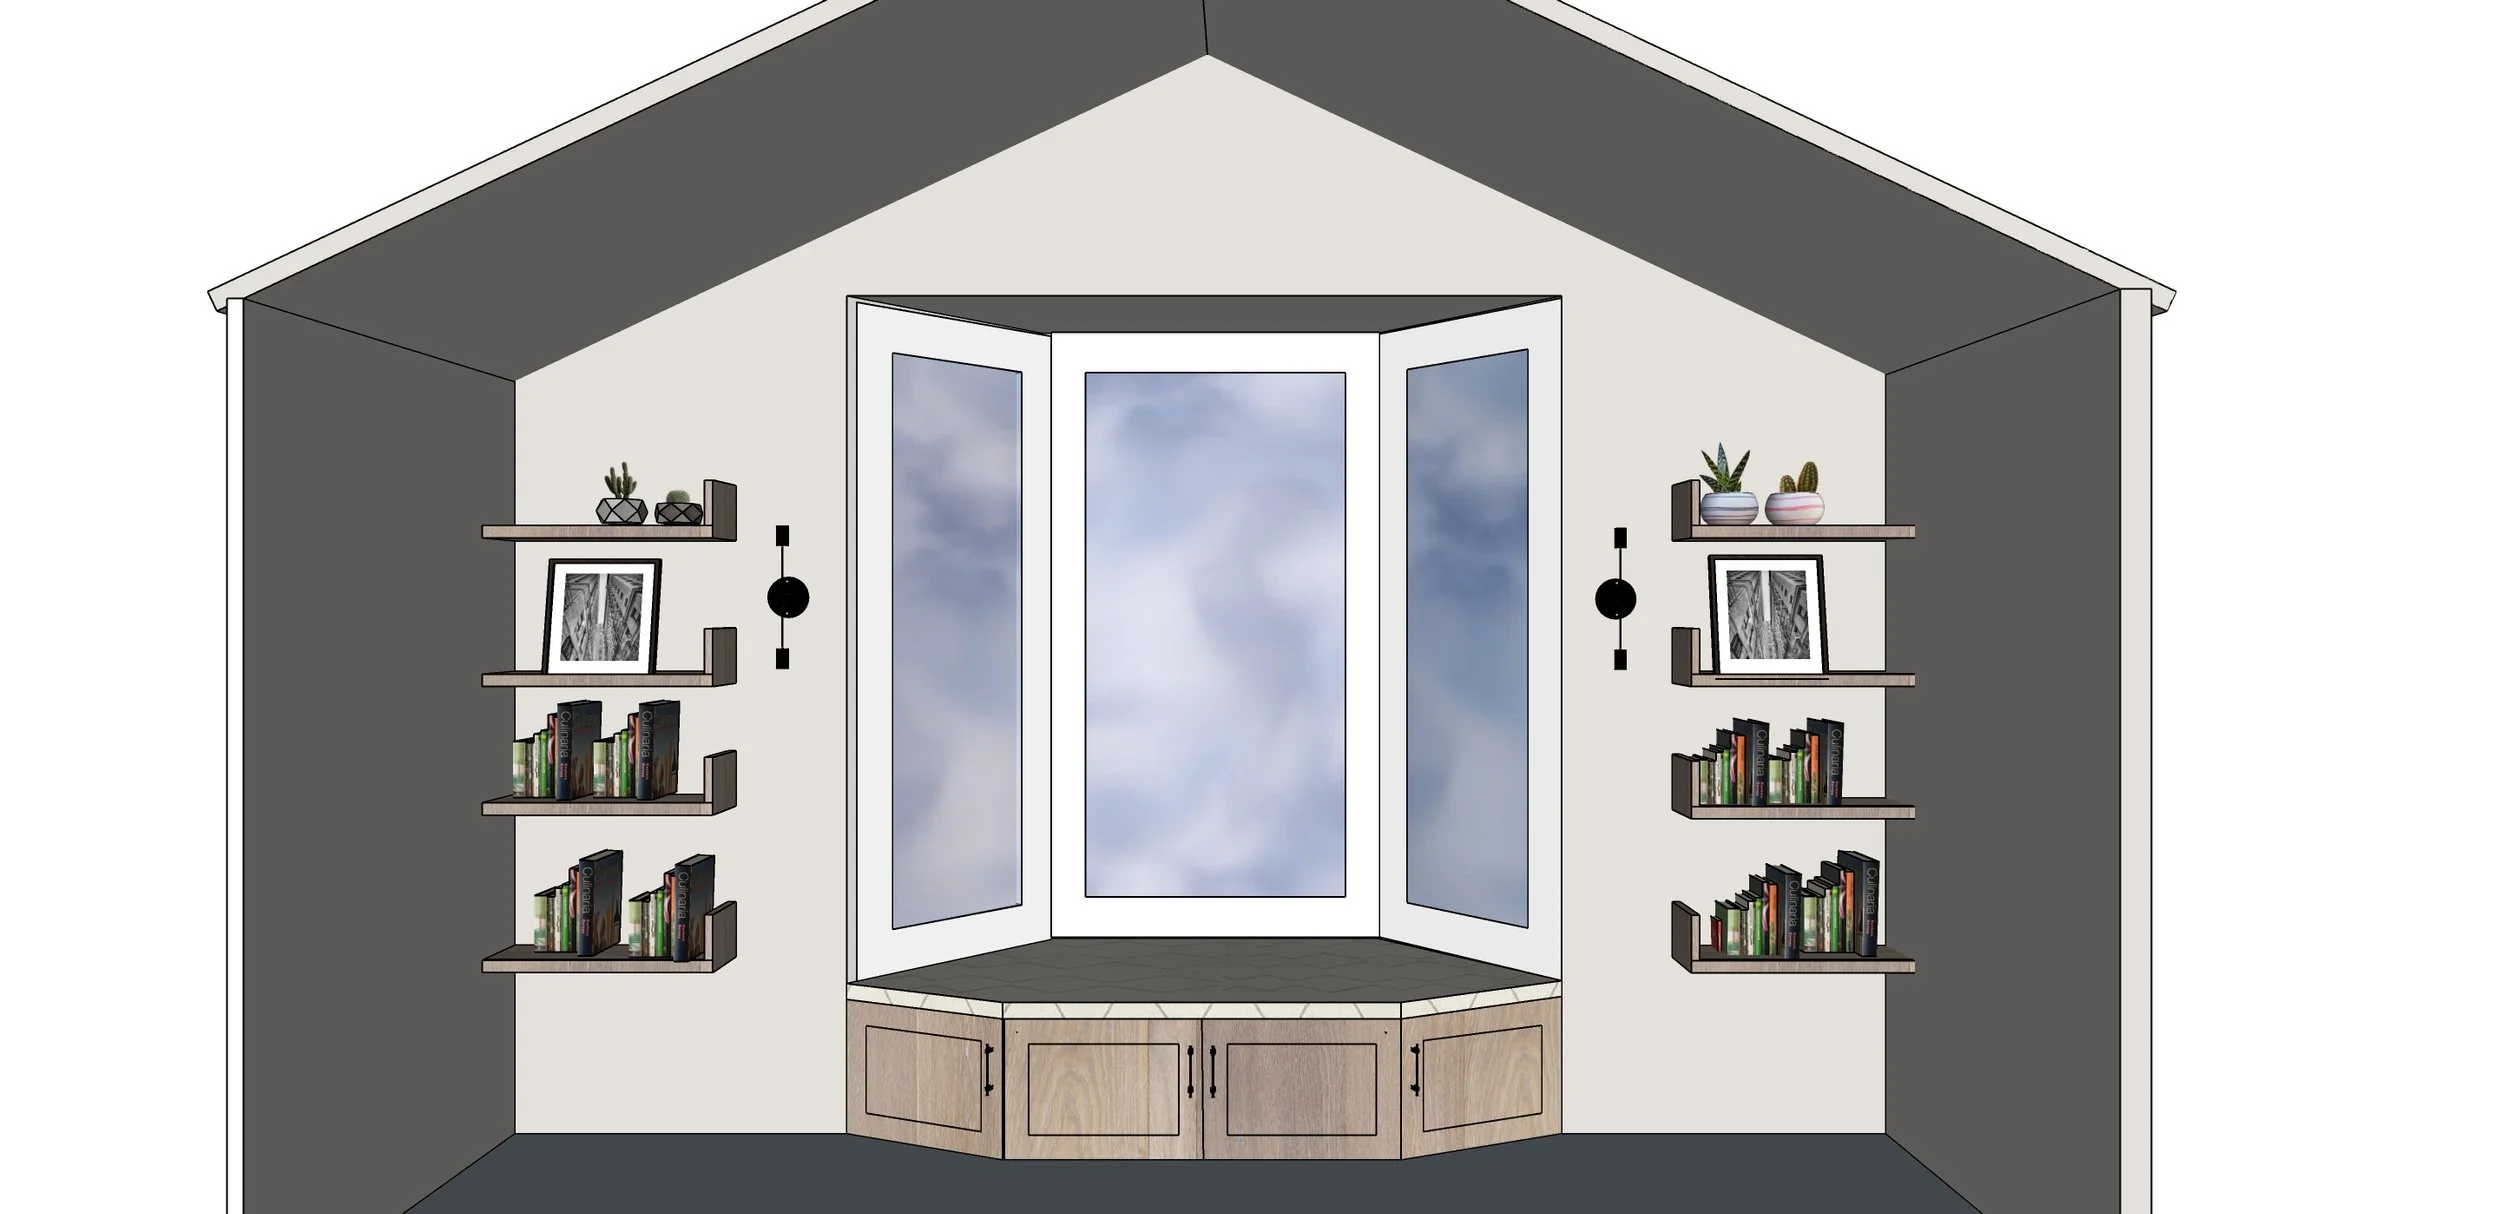
Floating shelves are designed with a simple L shape but with a lip so that items don’t fall out easily. Design is always a combination of look, form and function.
I believe that Design should always be “FASE”.
Functional, Aesthetically Pleasing, Sustainable, Ethical.


Bench takes a hexagon shape to maximize seating area without increasing the depth of the side walls.
4 - Implementation & Verification
I create detailed installation spec for contractor to implement the design. I check in frequently to verify that everything is done according to our vision. Below are some of the finish photos.


Cabinetry Drawings
I look for every opportunity to create more storage in this small room. I spotted an unused wall space behind the door so I added a niche with floating shelves. I also painted the back wall black and added under shelf lighting to add to the visual drama. These wood shelves are made of recycled wood with natural coat.
2 - Idea Sketches
In designing the reading nook, I wanted to create a statement wall with reading and storage function. Thus, I designed a bench, some storage cabinets, a bay window flanked by floating shelves. I used InDesign and SketchUp for design sketches. Below is one of the many design options that I worked through.


Finish Photo
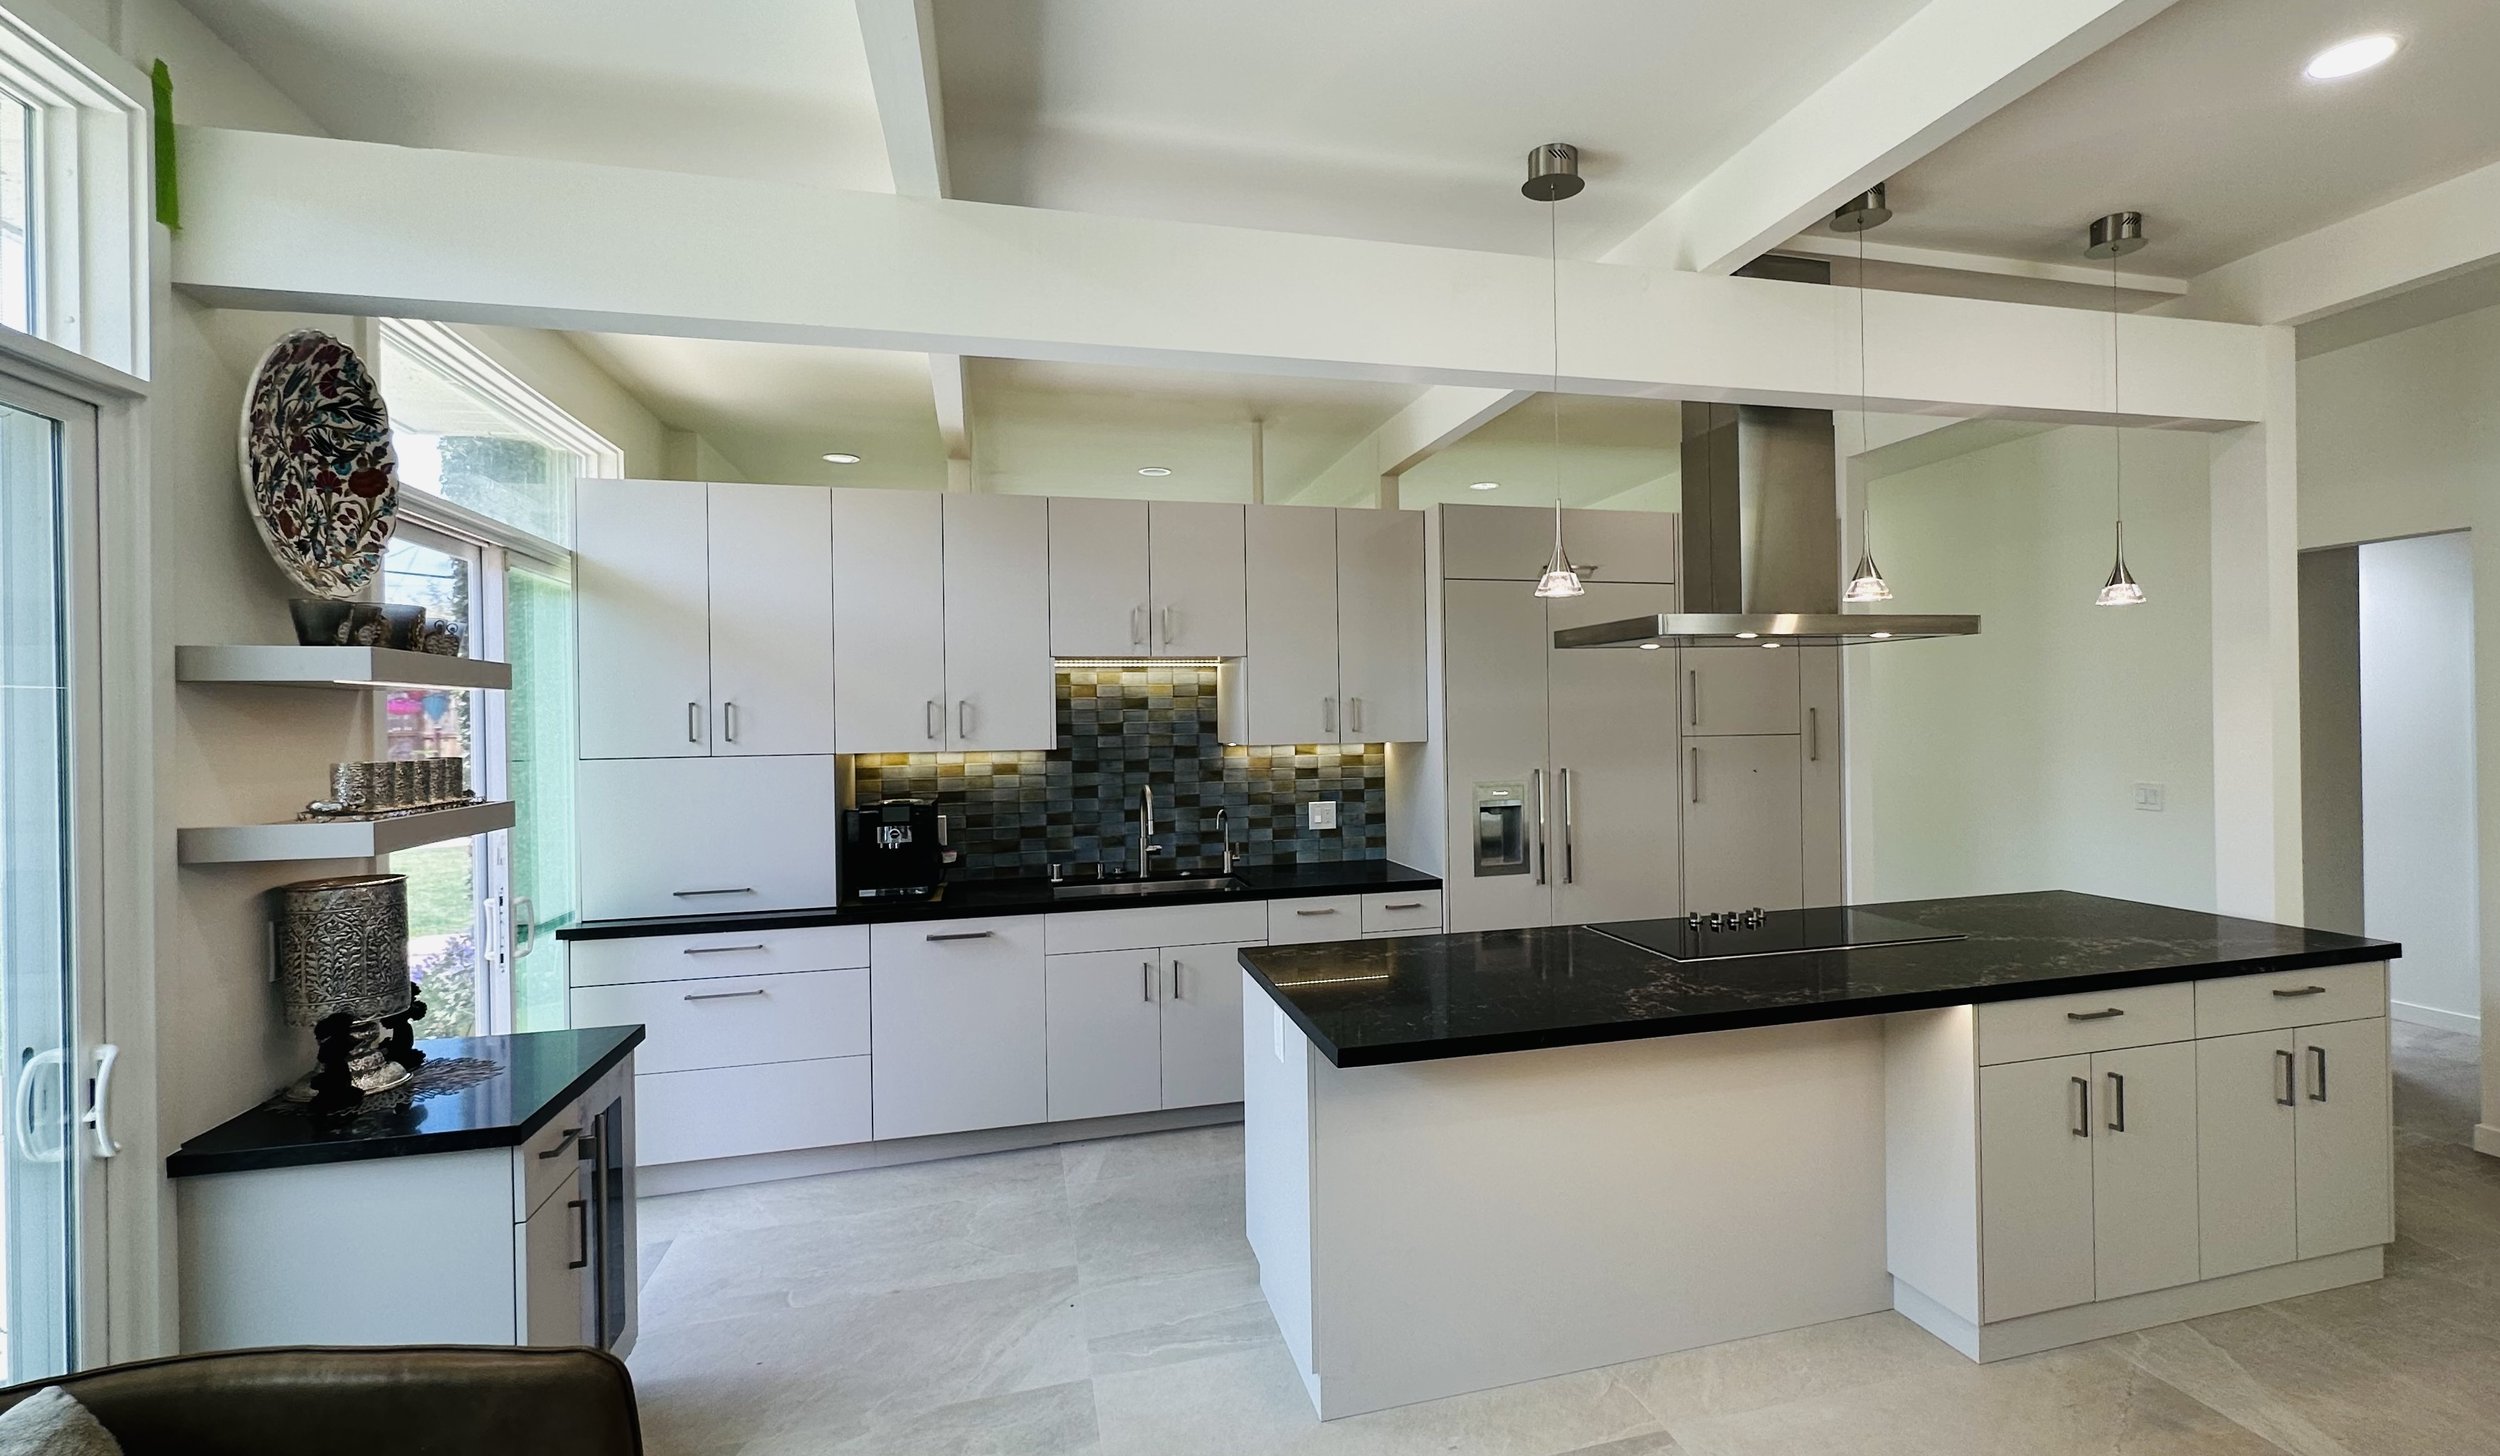
Kitchen Cabinetry Design
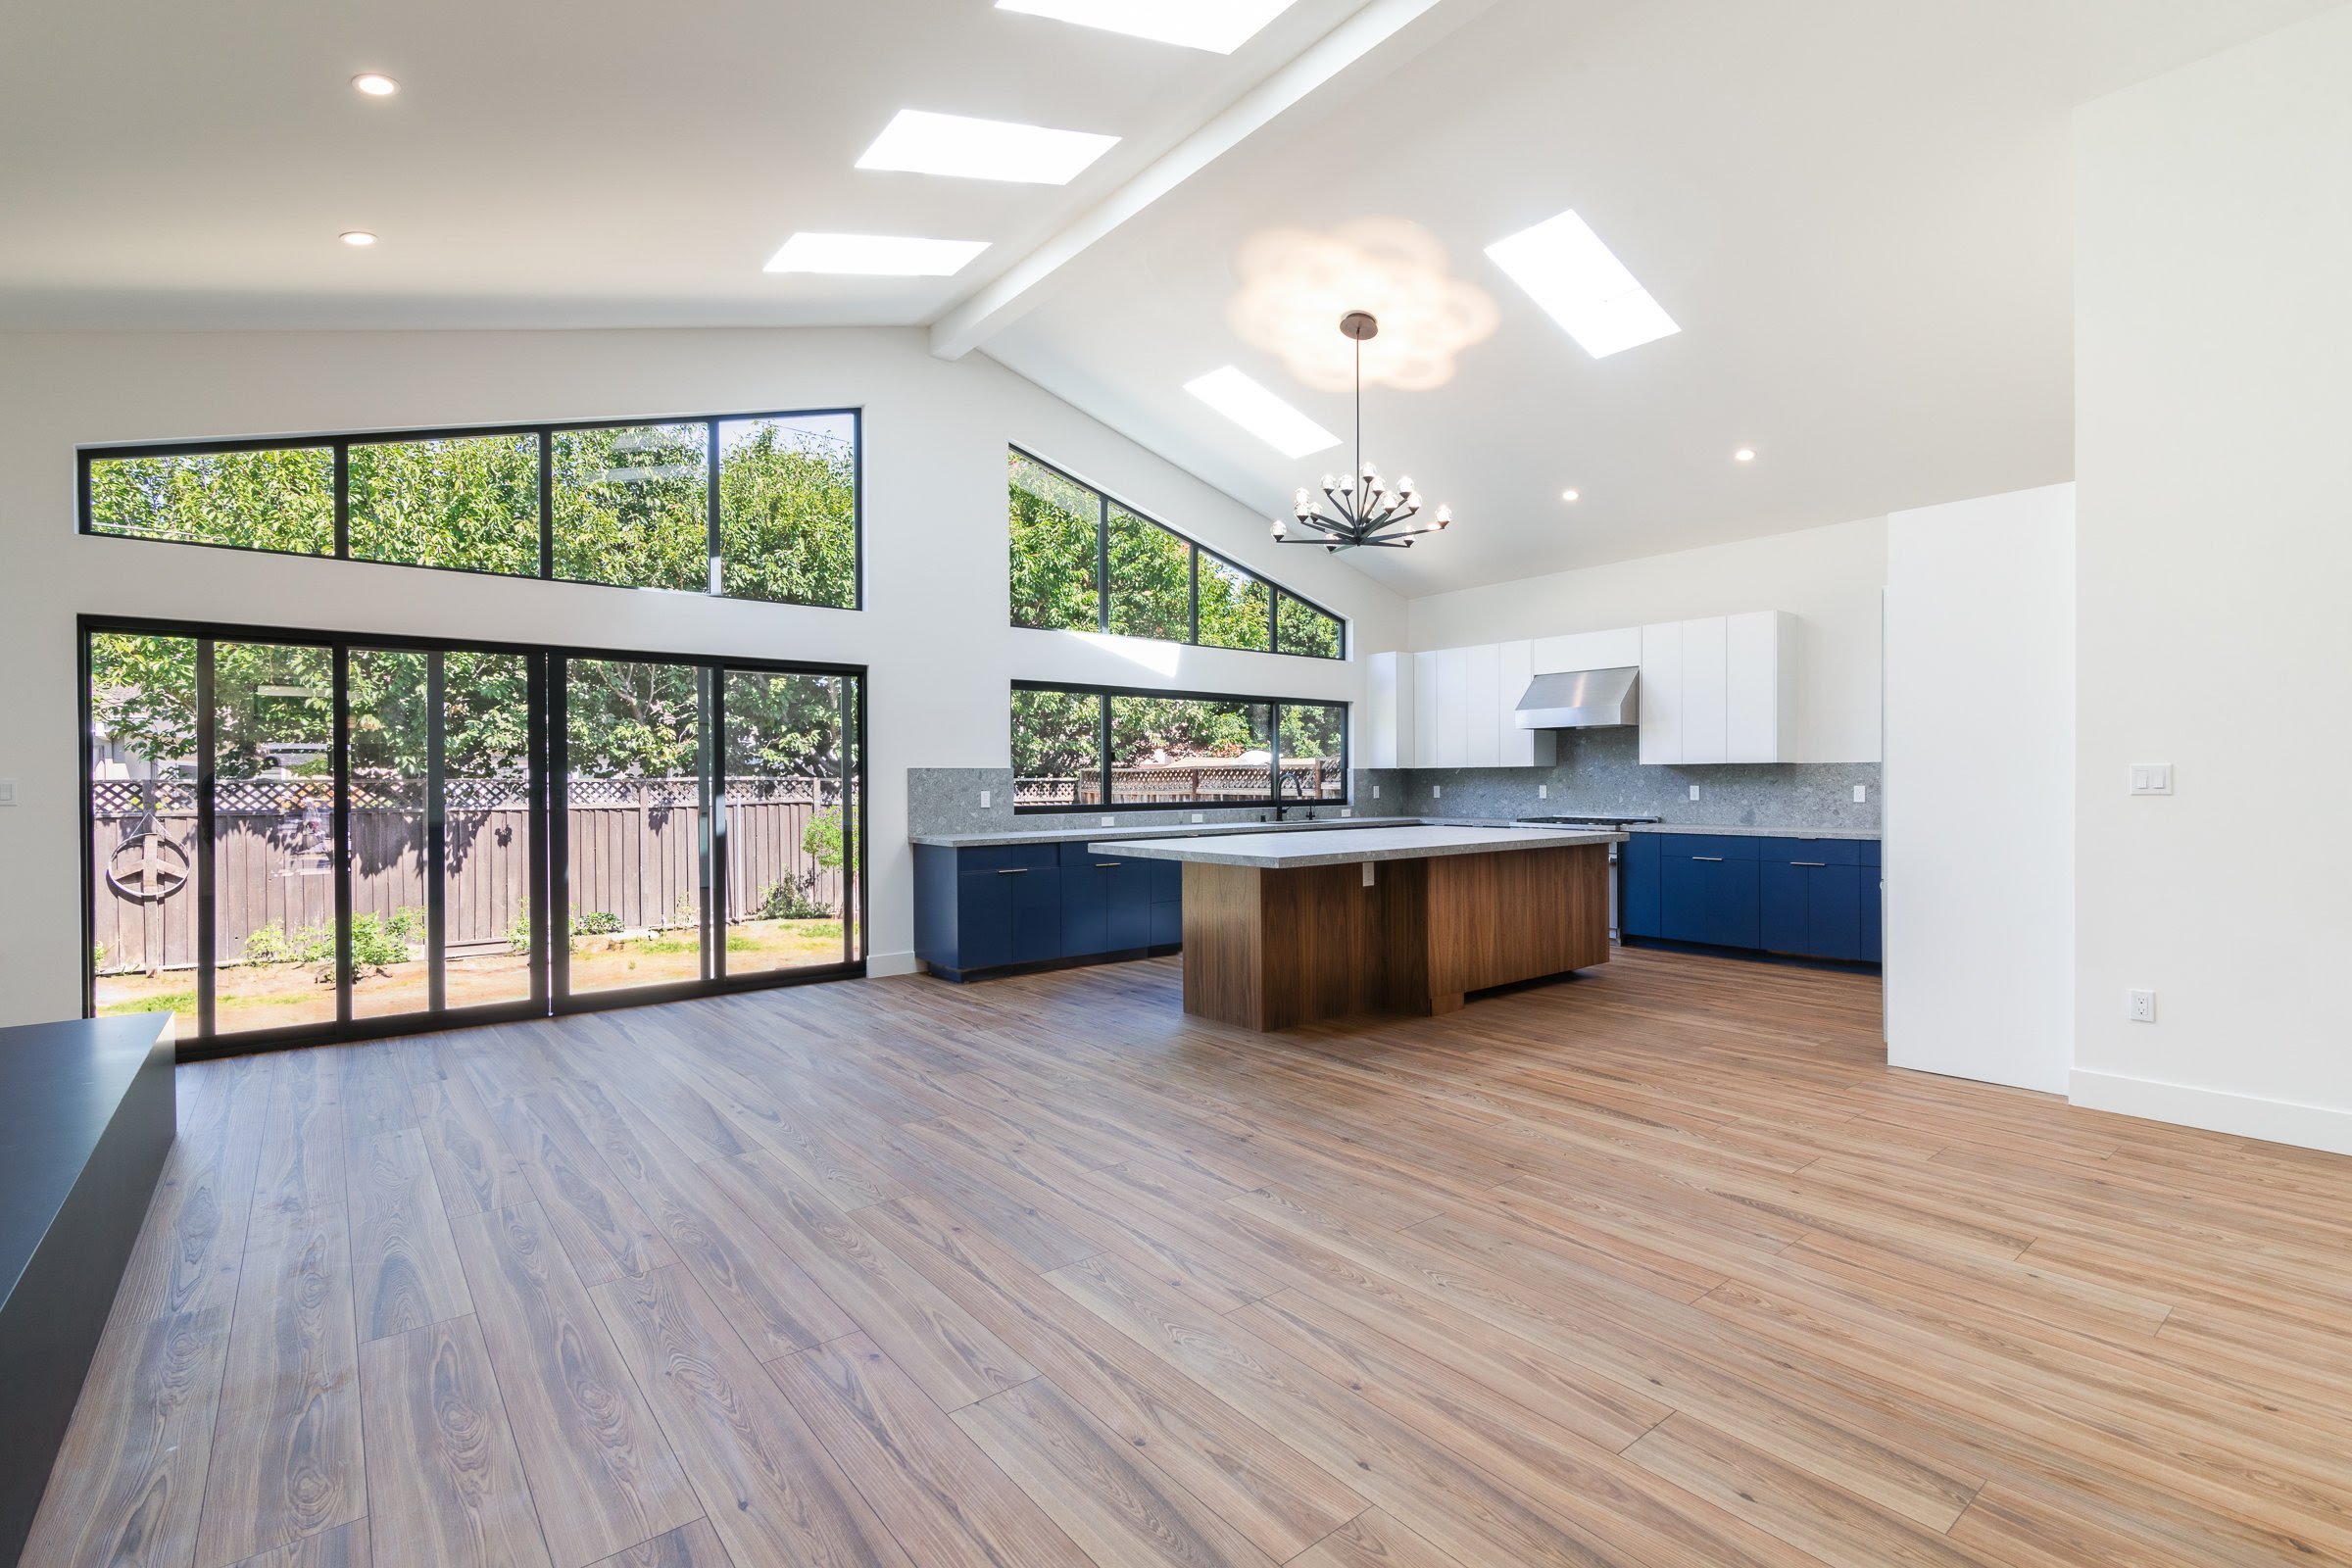
Kitchen cabinetry design requires a lot of attention to detail, and a deep understanding of the client’s daily routine. In this project, I designed an open kitchen floor plan by removing an interior wall and deliberating maintaining an open space around the cabinetry. This allows all the natural light to fill the kitchen from the big windows.
Design is a always balance between look and function. For example, the tall cabinets on left/right are optimized and balanced, while countertop space around the sink is maximized.
Bathroom & Shelving Design
When guest walk into the bathroom, they see a statement wall in black marble with strong veins to produce visual movement. Black helps to visually recede the wall to make the room look bigger. Also, the contrasting bronze vanity finish with accent lighting adds to the visual drama.
Finish Photo
Finish Photo & Video
To achieve symmetry and function, all drawers look symmetrical and aligned on the outside but some open to a drawer that are two drawers combined to optimize storage

In this bathroom project, the space is tight and design is tricky but rewarding. I strive to maximize both the aesthetic and function in the limited real estate.
Tight spaces require optimal space usage. These layouts are some of the many options I did exploring corner shower to allow for a larger vanity and that the toilet can be more hidden. Client eventually decides to have a bigger shower but smaller vanity. As a designer, I want to present all the sensible options while clearly laying out the pros and cons.
To design the interior features of each cabinet, I have to understand how the client will use each cabinet and what they will put in them. This step alone took about a month to complete

Design Animation
Using Sketchup, I create design animations so clients can better visualize the design in the new space.
Using Adobe InDesign, I present mood boards so clients can better visualize how different materials and colors coordinate in each space.
My Mission - Reconnecting People With Nature
People are generally very busy and stressed nowadays. As a designer, I strive to design living environment that is stress reducing, welcoming, and warm. I look for opportunities to reconnect people with nature by incorporating natural elements such as sunlight, wood, plants, furnishing that takes the shapes or colors of nature. Natural elements can elevate people’s mood, reduce stress and improve air quality, just to name a few benefits.
With a big skylight and indoor planters, I turned a narrow dark hallway into a welcoming and warm space.


An unused corner of the living room is turned into a cozy reading nook. The abundance of natural light, indoor planter, colorful accent chair and wood side table creates a harmonious space to sit down, read and relax.


I designed this front door for my client using mahogany wood. The door has decoratively natural elements such as flowers to reflect nature. It is a beautiful statement piece for the house entrance.
Using white oak, I designed a sewing and craft work station for my client. The cubbies, drawers and large work space are tailored for her needs. This work station can also be closed up using custom made bifold doors. Once closed, the station looks just like the closet next to it.


I love skylights because they bring in abundance of natural lighting. Natural lighting helps to add warmth and happiness to every space.
Natural light, wood, and natural elements like weaved seagrass basket, flower pattern wallpaper, plant, natural stone are incorporated into these spaces.
Personal Projects
In the next five years, I want to establish my Harmony Interior furniture and furnishing brand. All products will use renewable, sustainable materials and finishes. My designs will take on the shapes and colors of natural elements such as plant, water drop, flower, tree, etc. During my spare time, I am taking woodworking classes, and experimenting with some new products on my own.
Design Sketch

Lamp Post Actual
Two tulip petals are asymmetrical and lamp post will also be made of wood
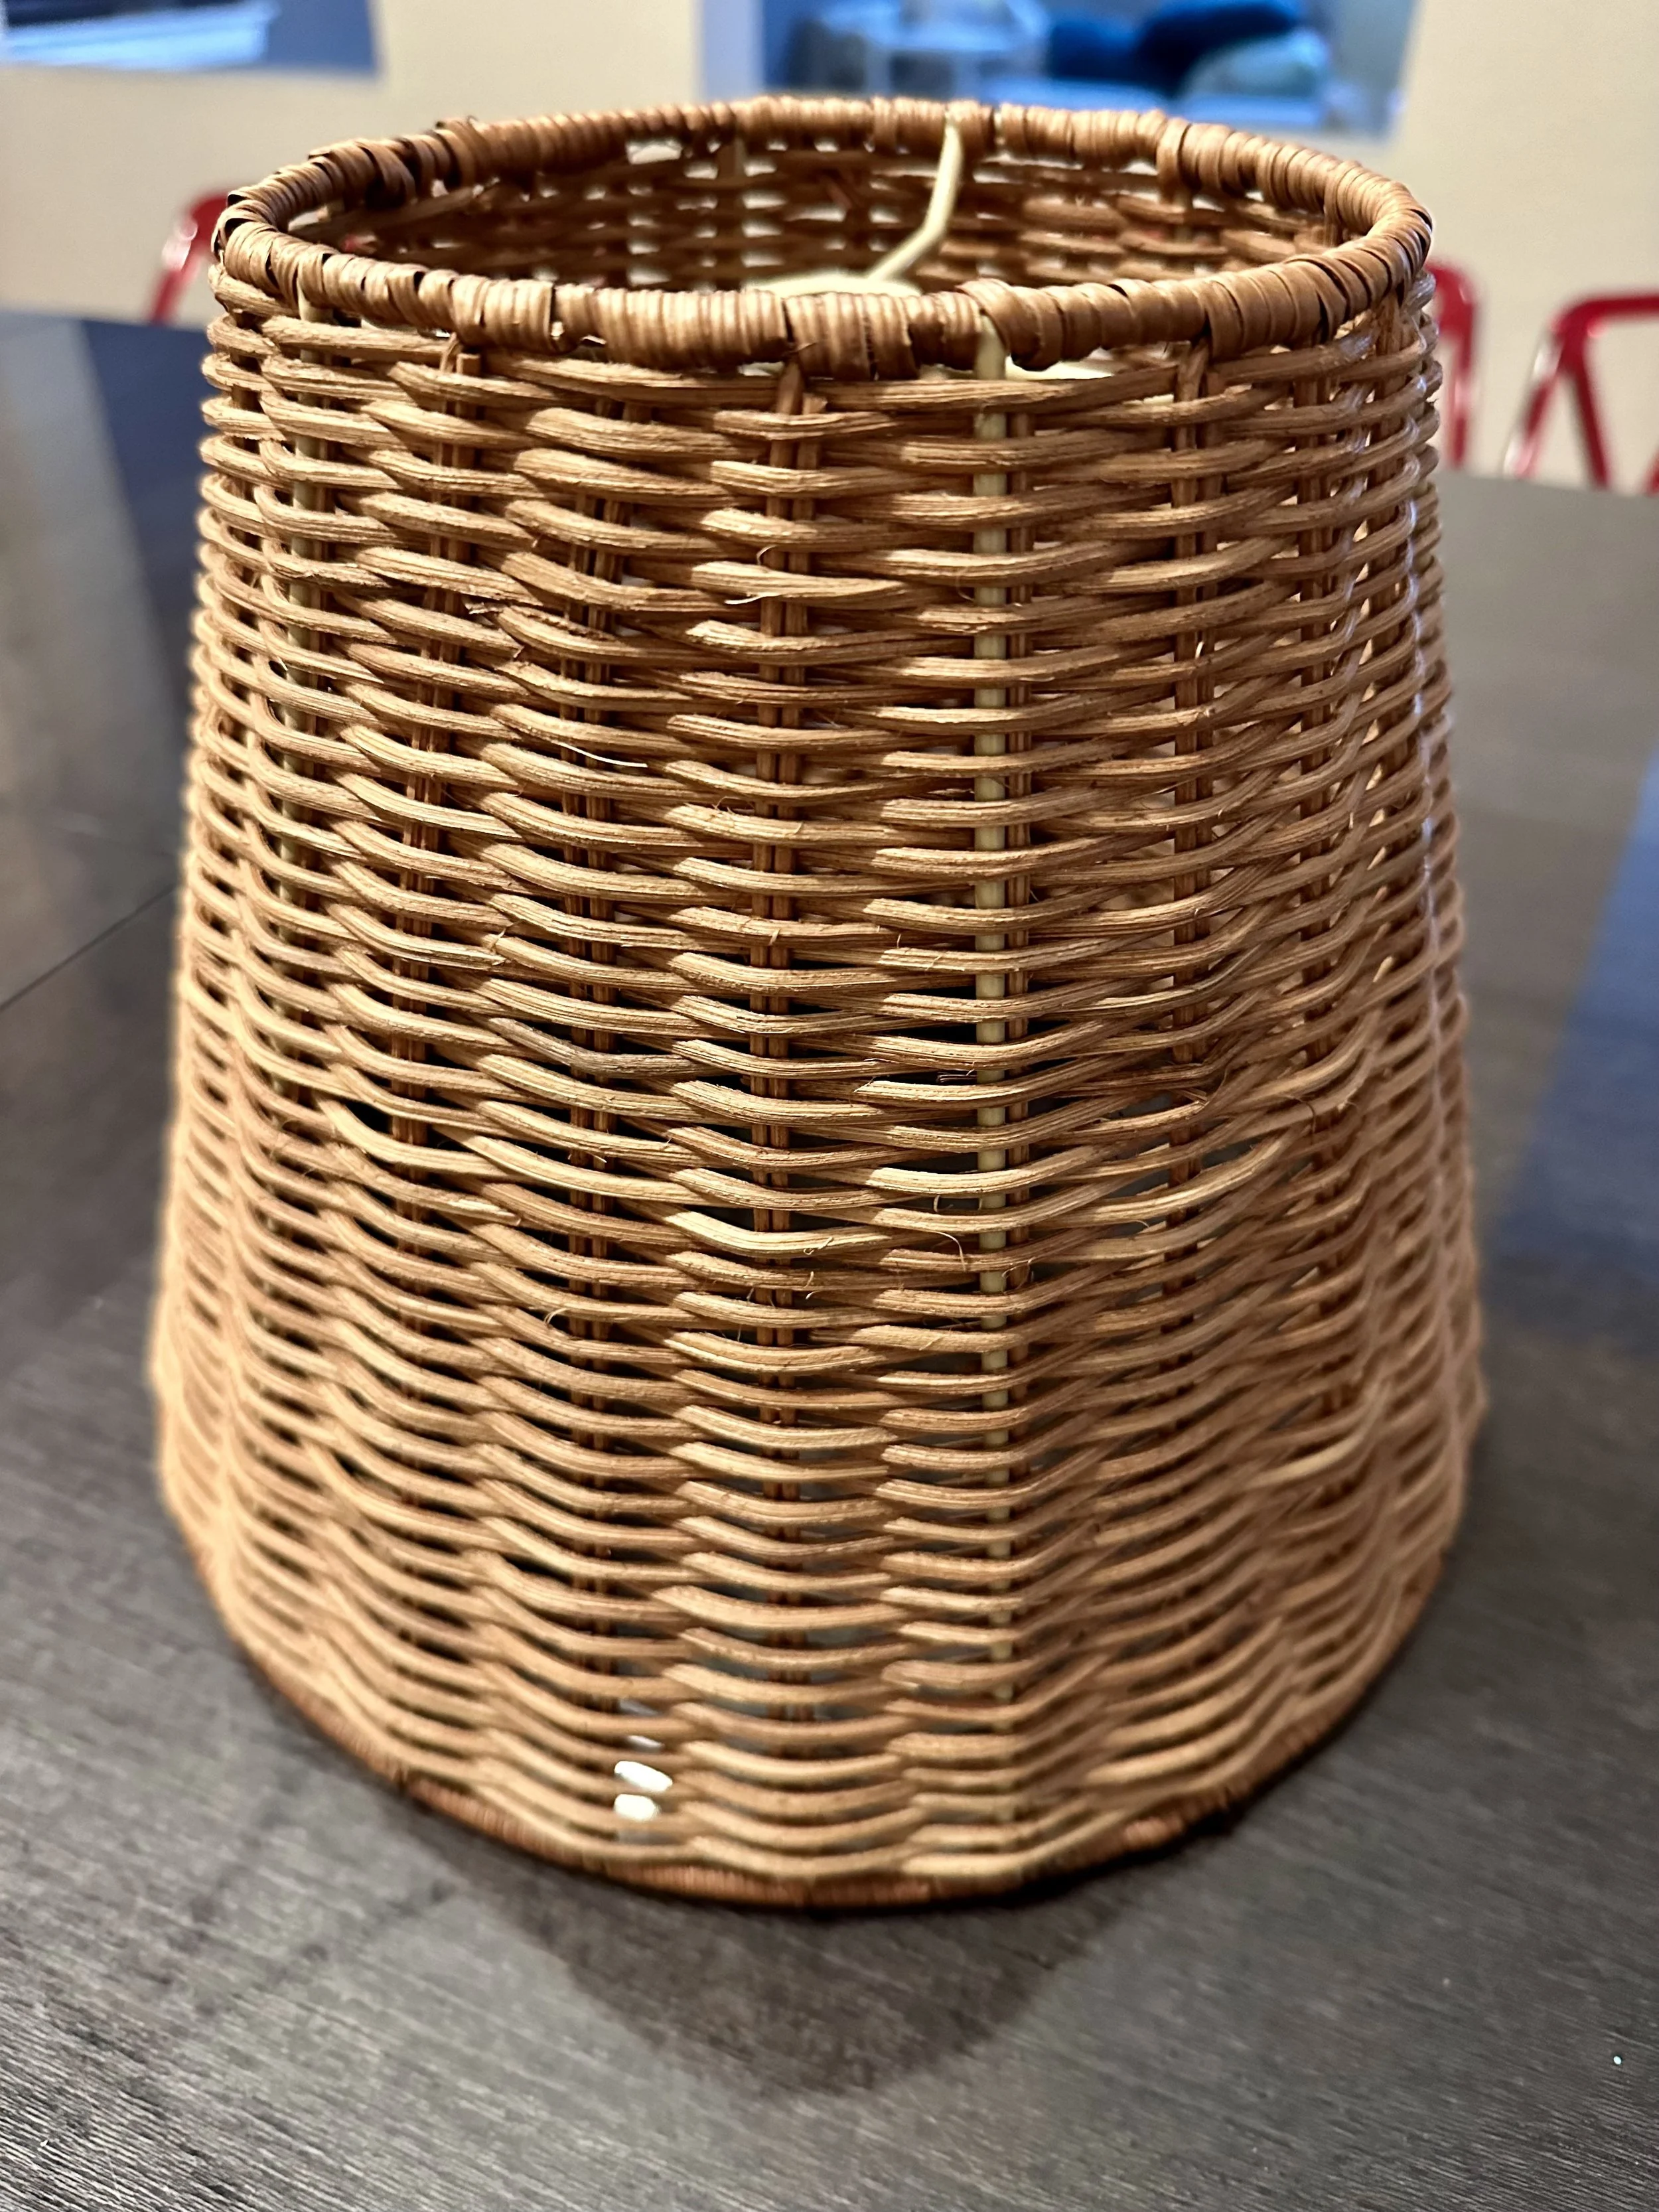
Lamp shade is made of woven rattan
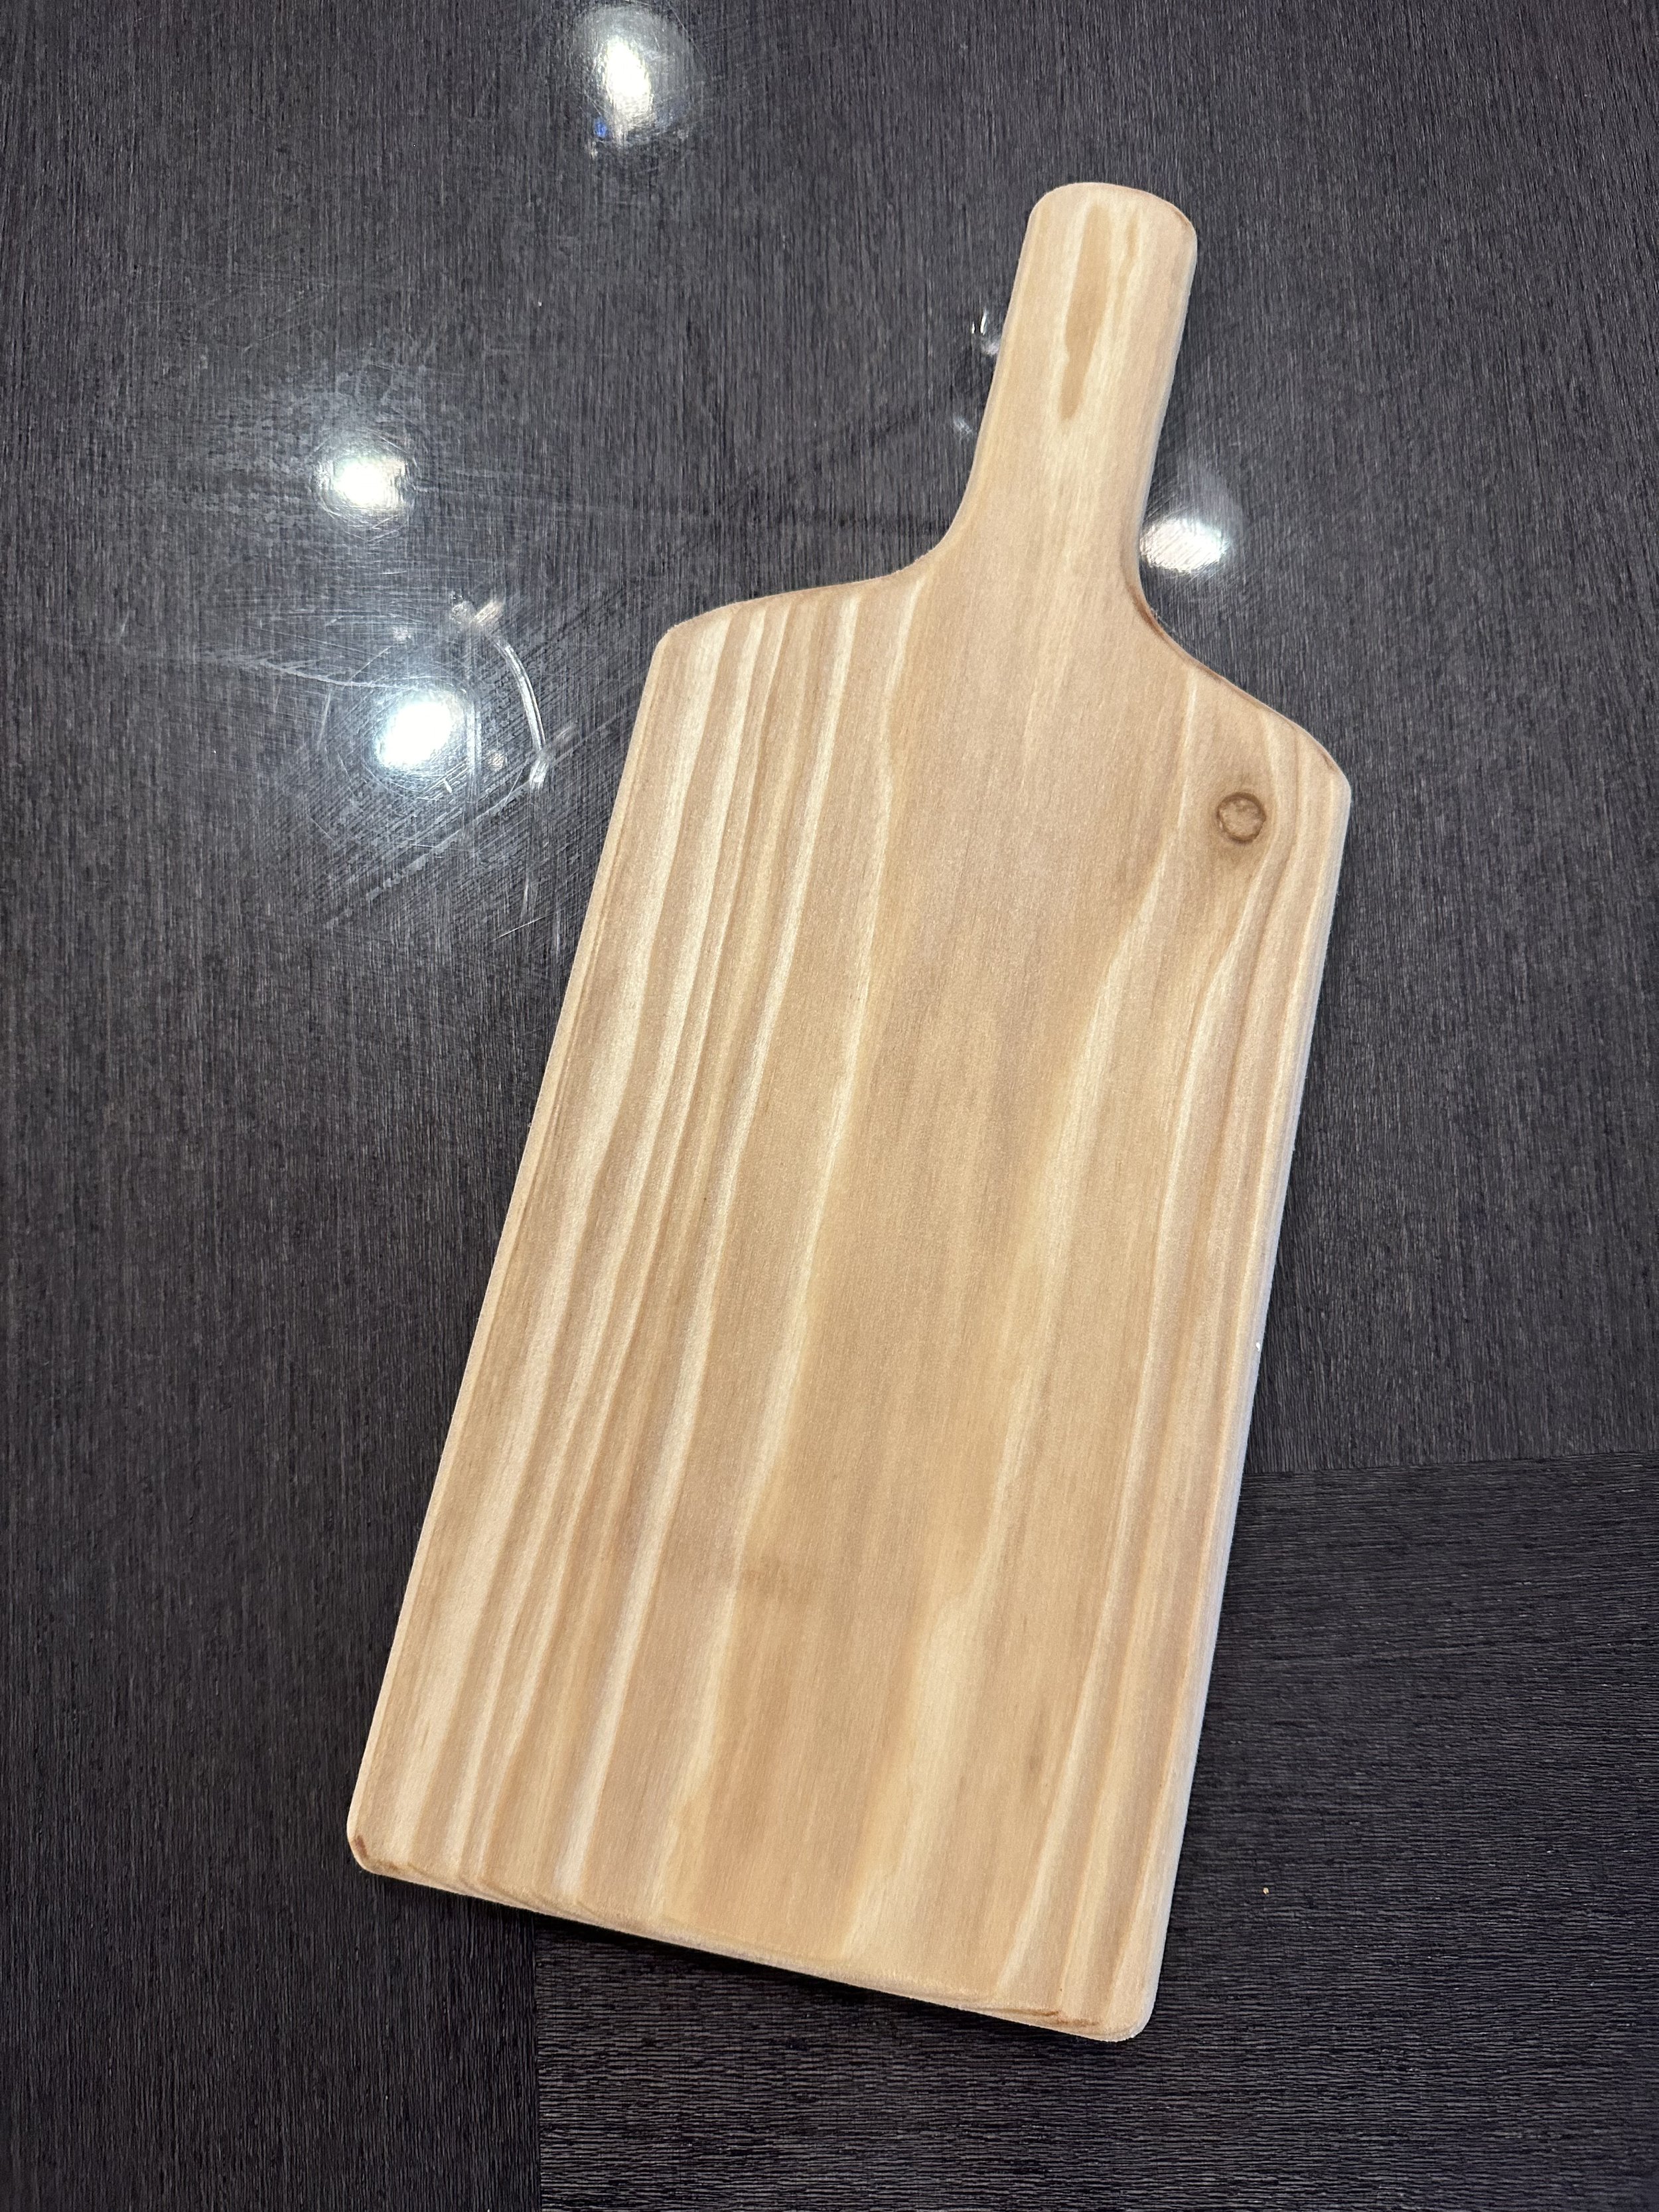
Cheese Board
I am naturally drawn to curves and simple lines
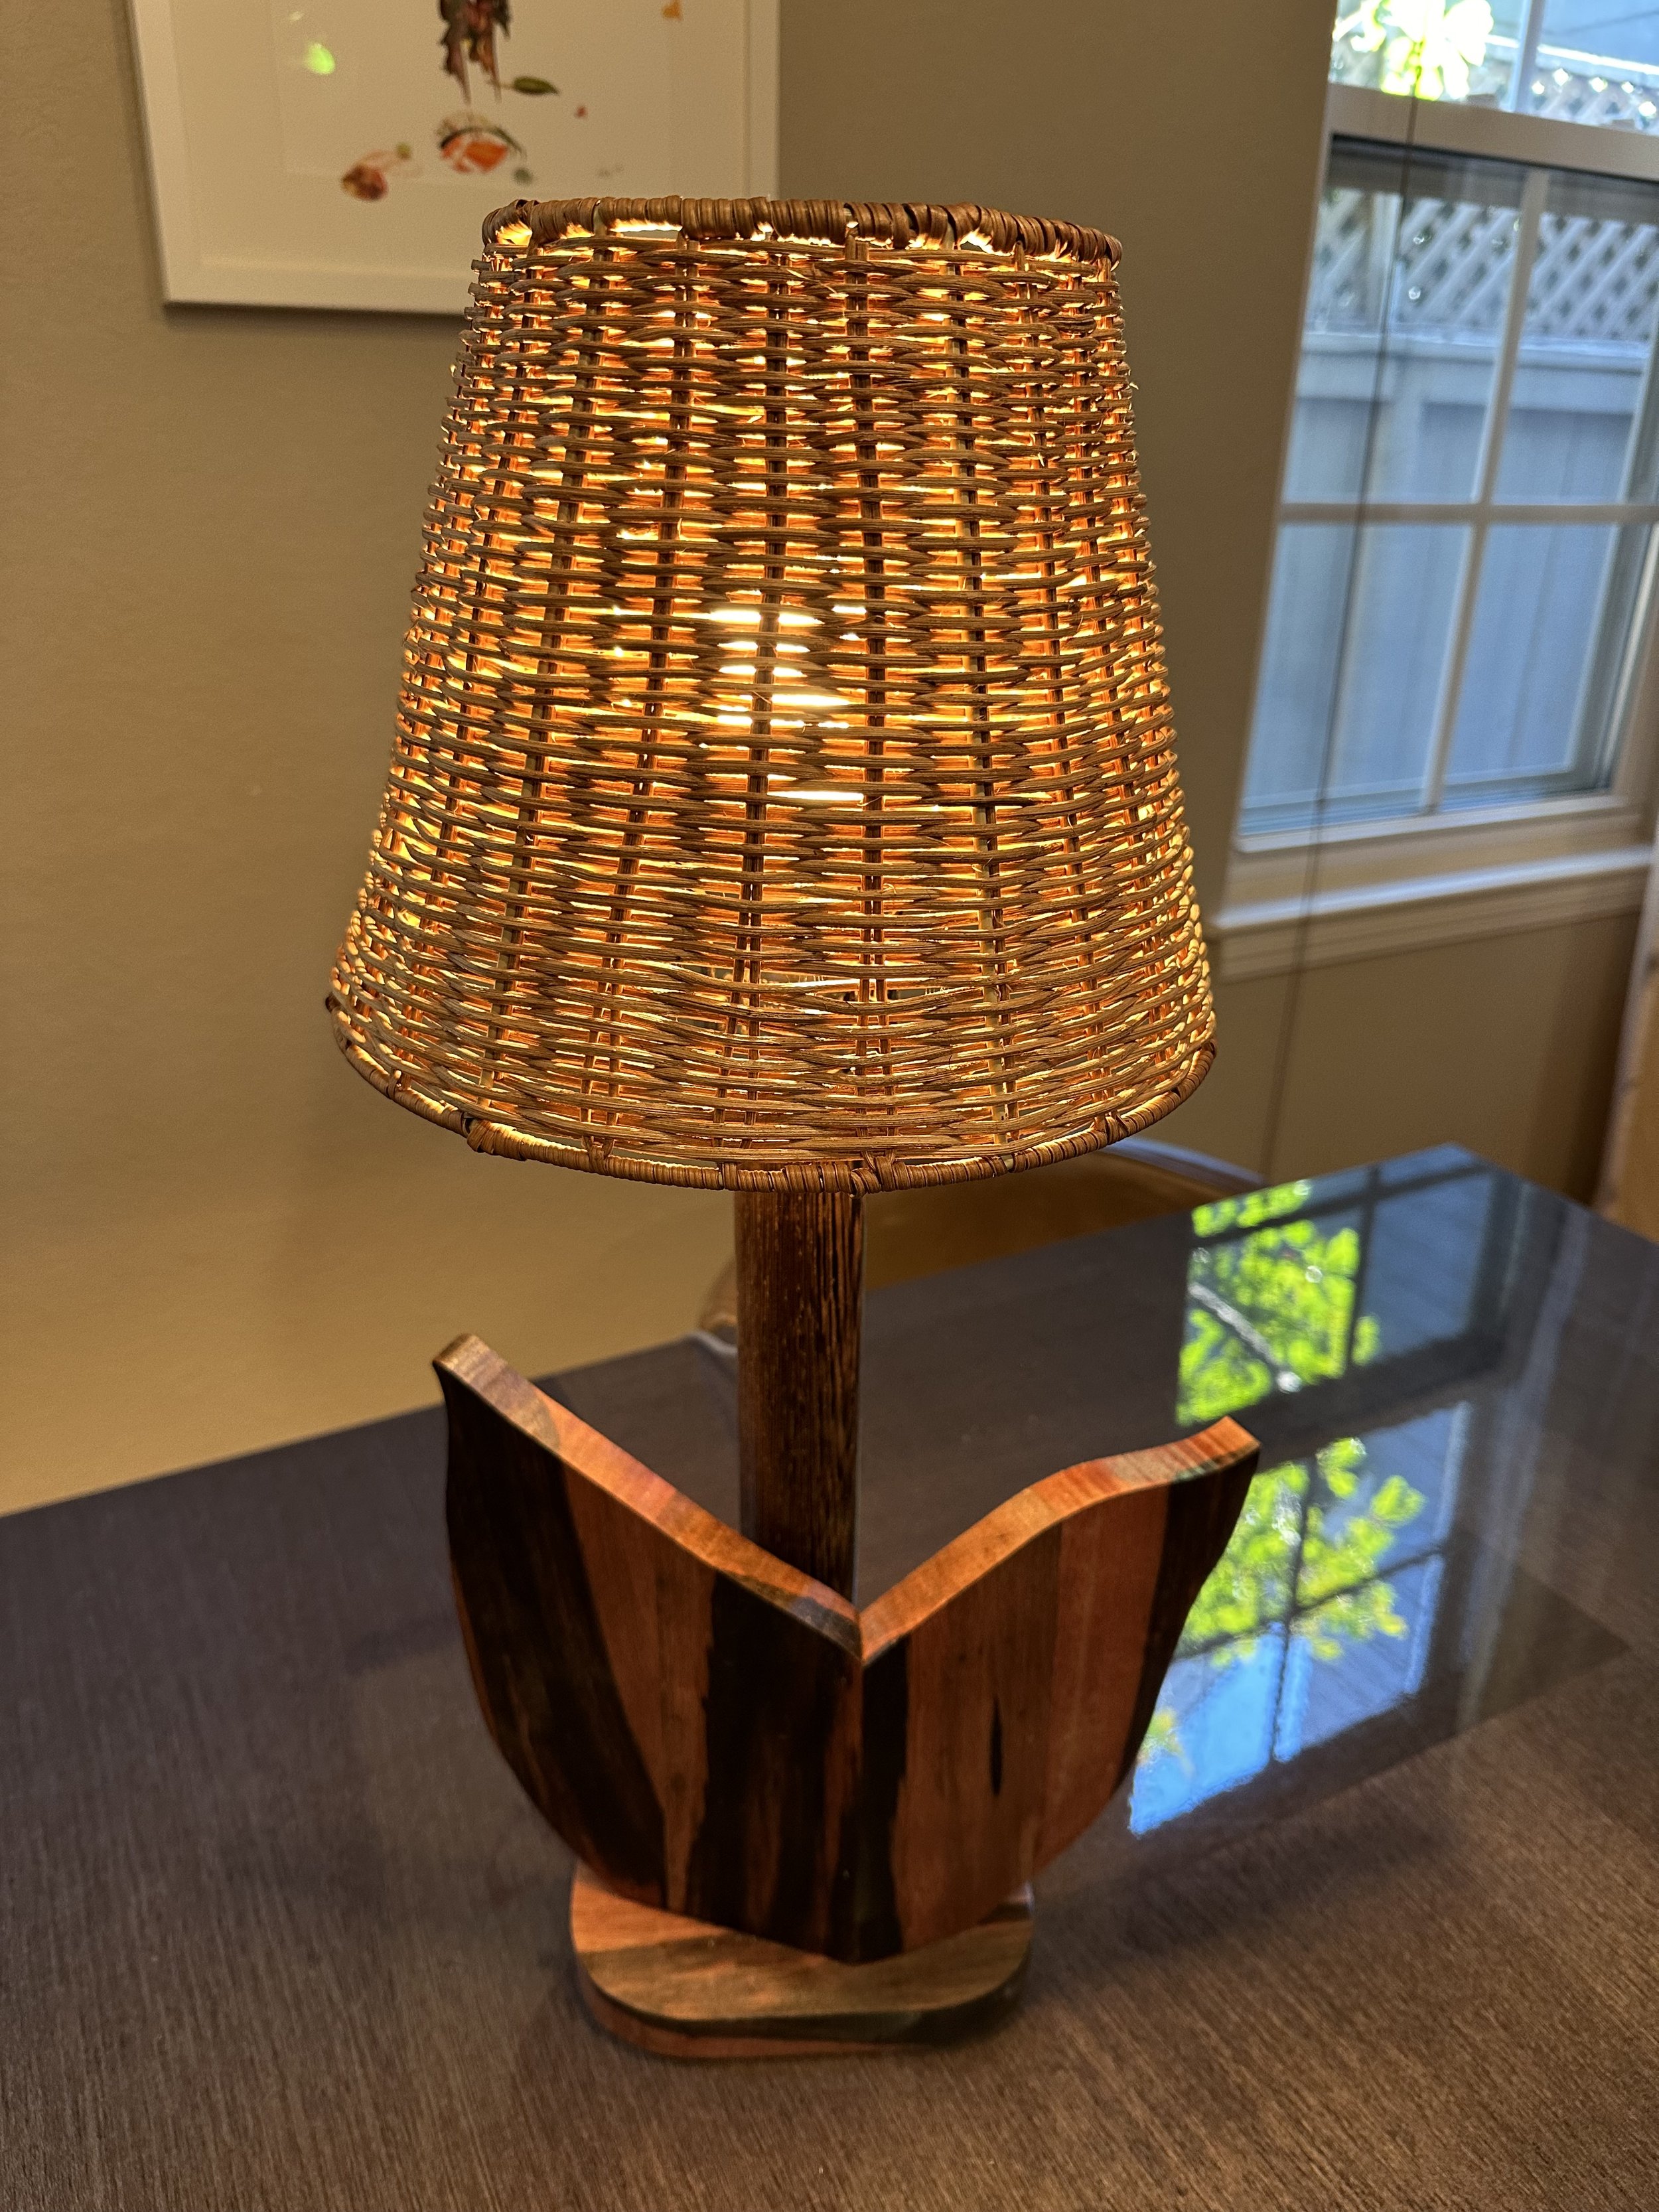
Tulip lamp belongs to one of my inventions that adopt the shape and material of natural elements. This lamp takes the shape of a tulip and its body is made of wood with water based non toxic coating. I want to display the natural beauty of the wood veining, texture and color.

Tulip Lamp
Design Template


Natural wood with clear water based non toxic coating.
Wood Choices
Ebony Macassar
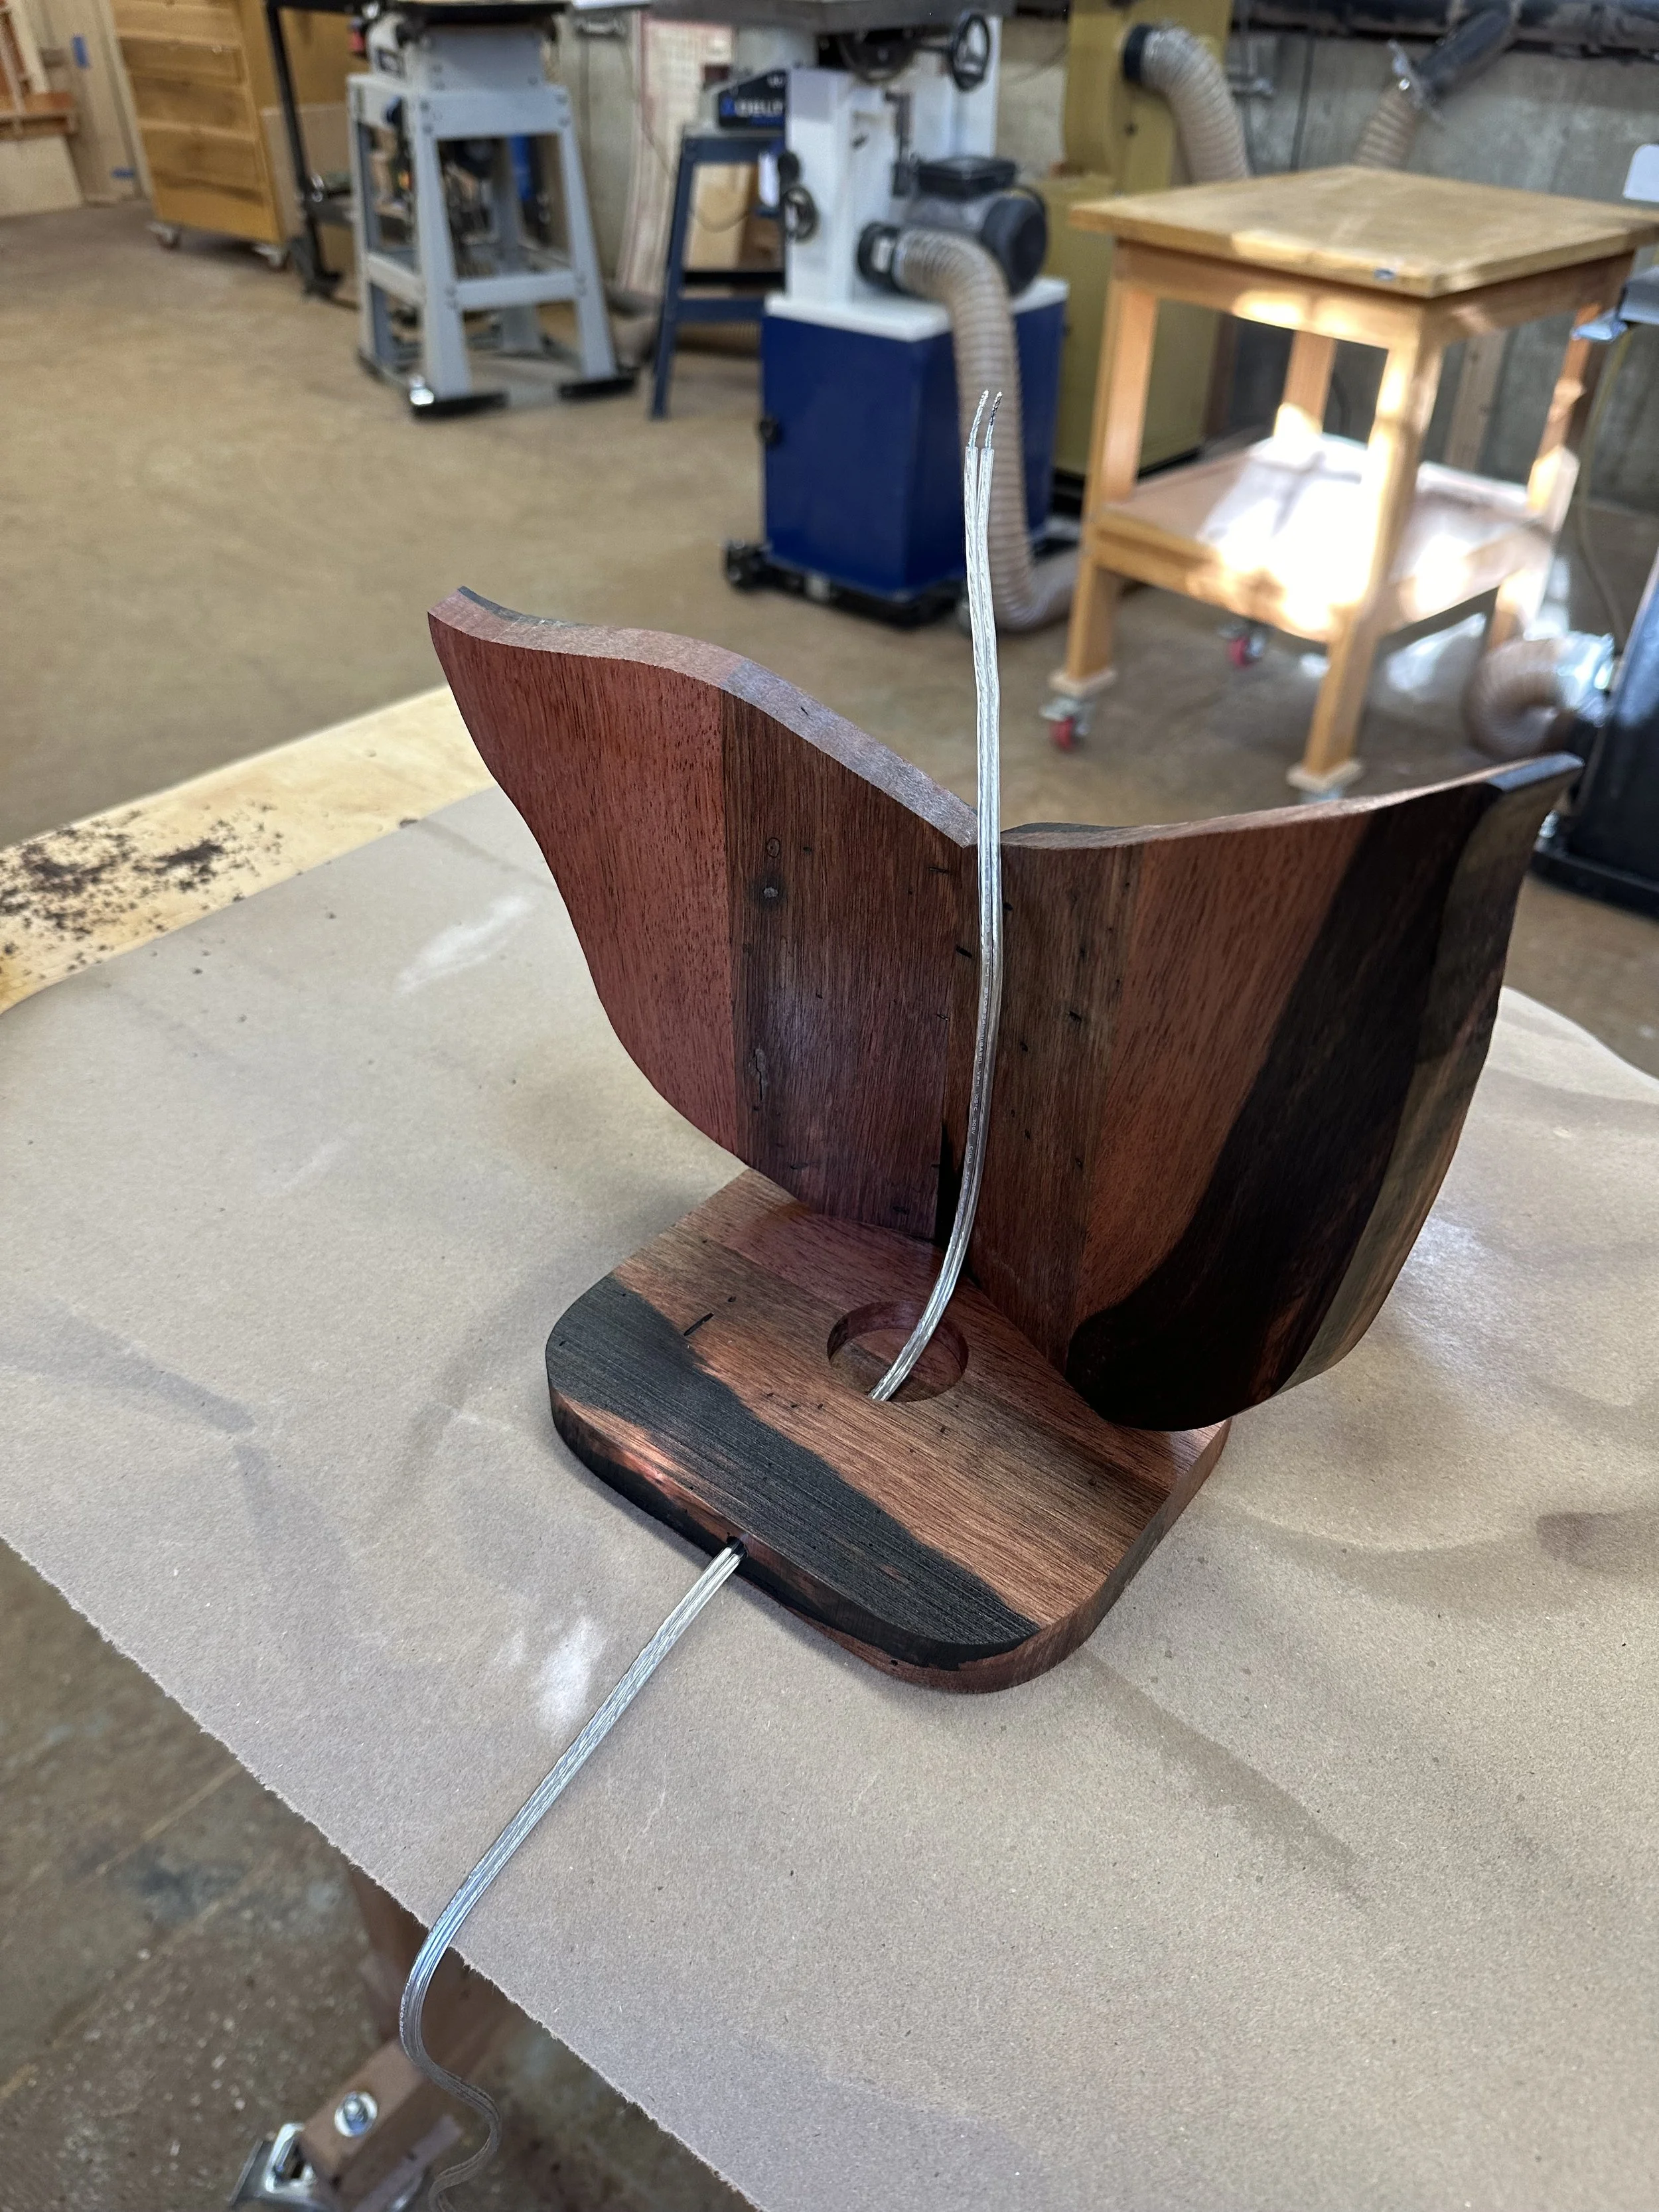
Lamp post (bottom right) consisted of two pieces of dark wood glued together while I created a channel in the middle for the wire cable.
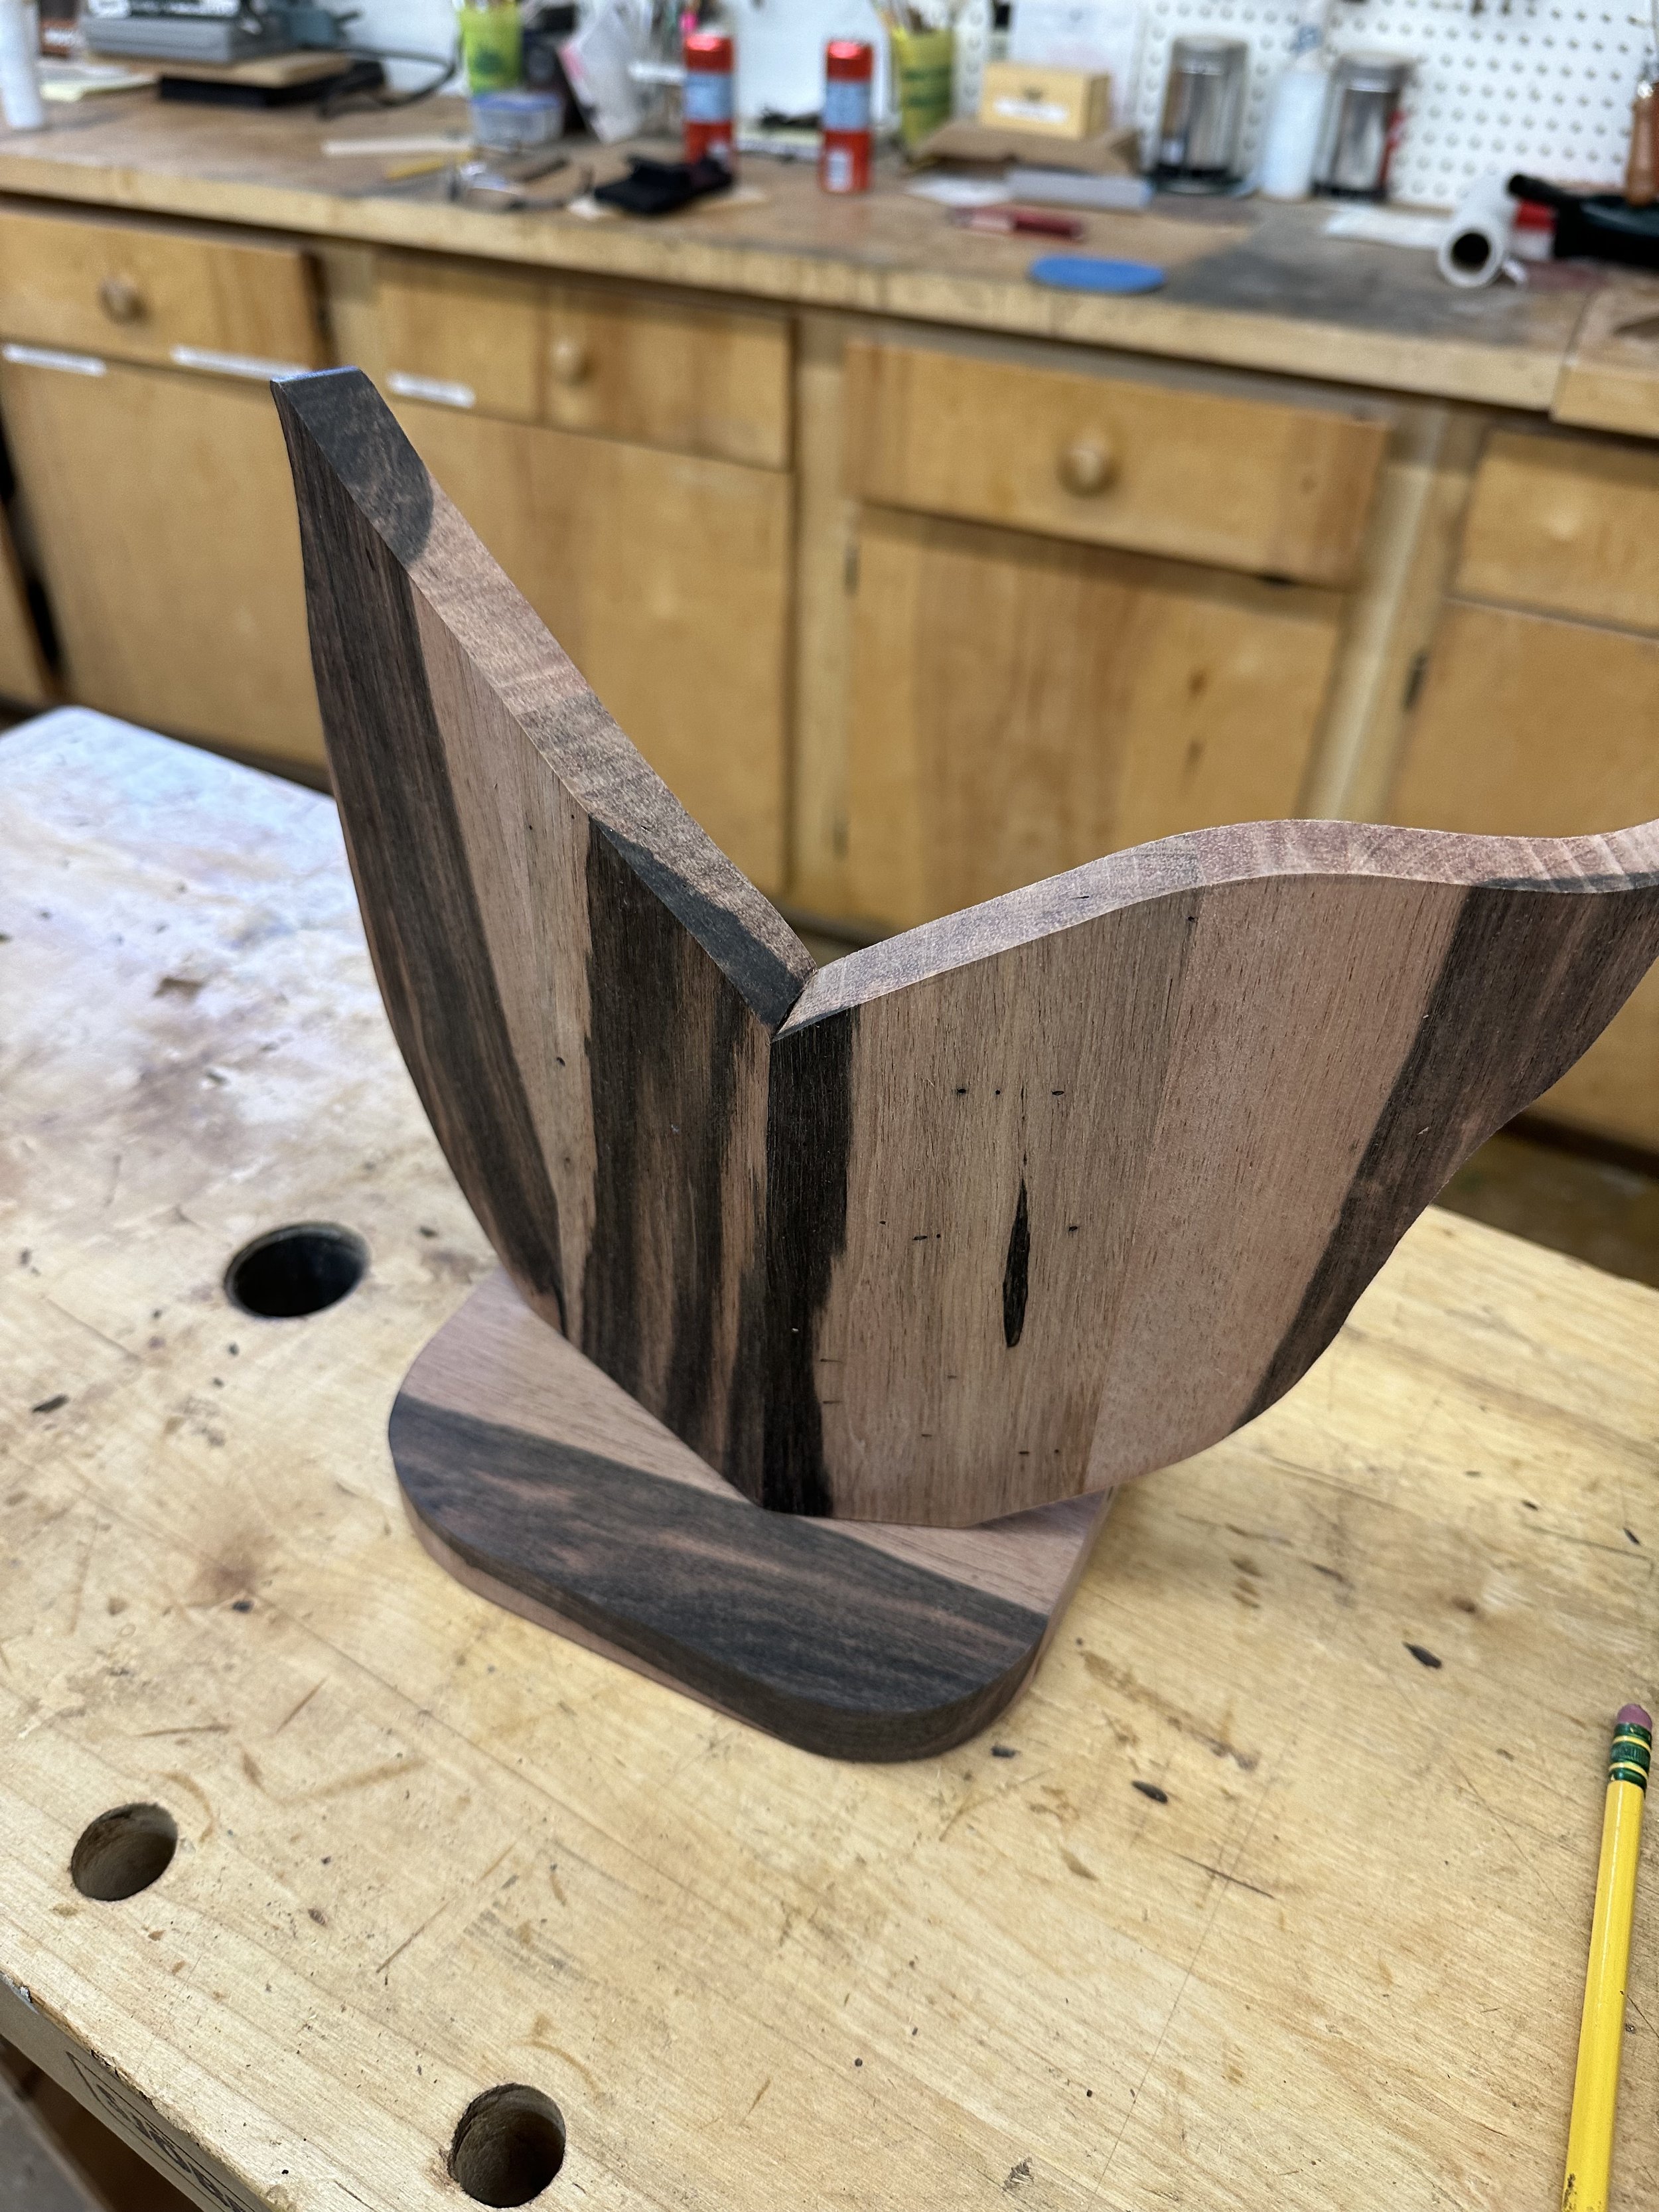


Lamp Body Prototype
Zebra

I wanted to choose a wood species that would accentuate the lamp body consisting of two main petals. Ebony Macassar pinkish color tone and veining mimic that of the two flower petals perfectly. It was a better choice than zebra wood.
Here, I glued two pieces of Ebony Macassar as the tulip petals (top left). The wood veining accentuated the two tulip petals. .
For the lamp post, I took the rectangular dark piece of wood that was glued together with the channel. I used a lathe to round it out into a cylinder.
The three main pieces of the lamp
Here I routed the wire through the base up to the lamp post. I then installed the lamp socket, harp and shade.


Lamp Body Actual
While waiting for the above wood panels to be glued together, a prototype was made to test out my idea that the two petals can be angled at 20 degree. This created a three dimensional look and added more depth to the lamp body. Prototype worked!

As I continue to refine my design, the Tulip Lamp might eventually be part of my Harmony Interior Home furnishing collection.
After the lamp body wood panel was glued, I used a chop saw to cut it into two pieces. One for the left tulip panel and one for the right tulip panel. I used a panel saw to miter one edge of each panel such that the two panels can join at 20 degree angle (proven by the previous prototype). I then used a band saw to cut the panels into asymmetrical curvy petal shapes.
For the lamp base, I used the band saw to cut a remaining piece of Ebony Macassar into a rectangular piece with rounded corners. I then used sand paper to smooth all edges.

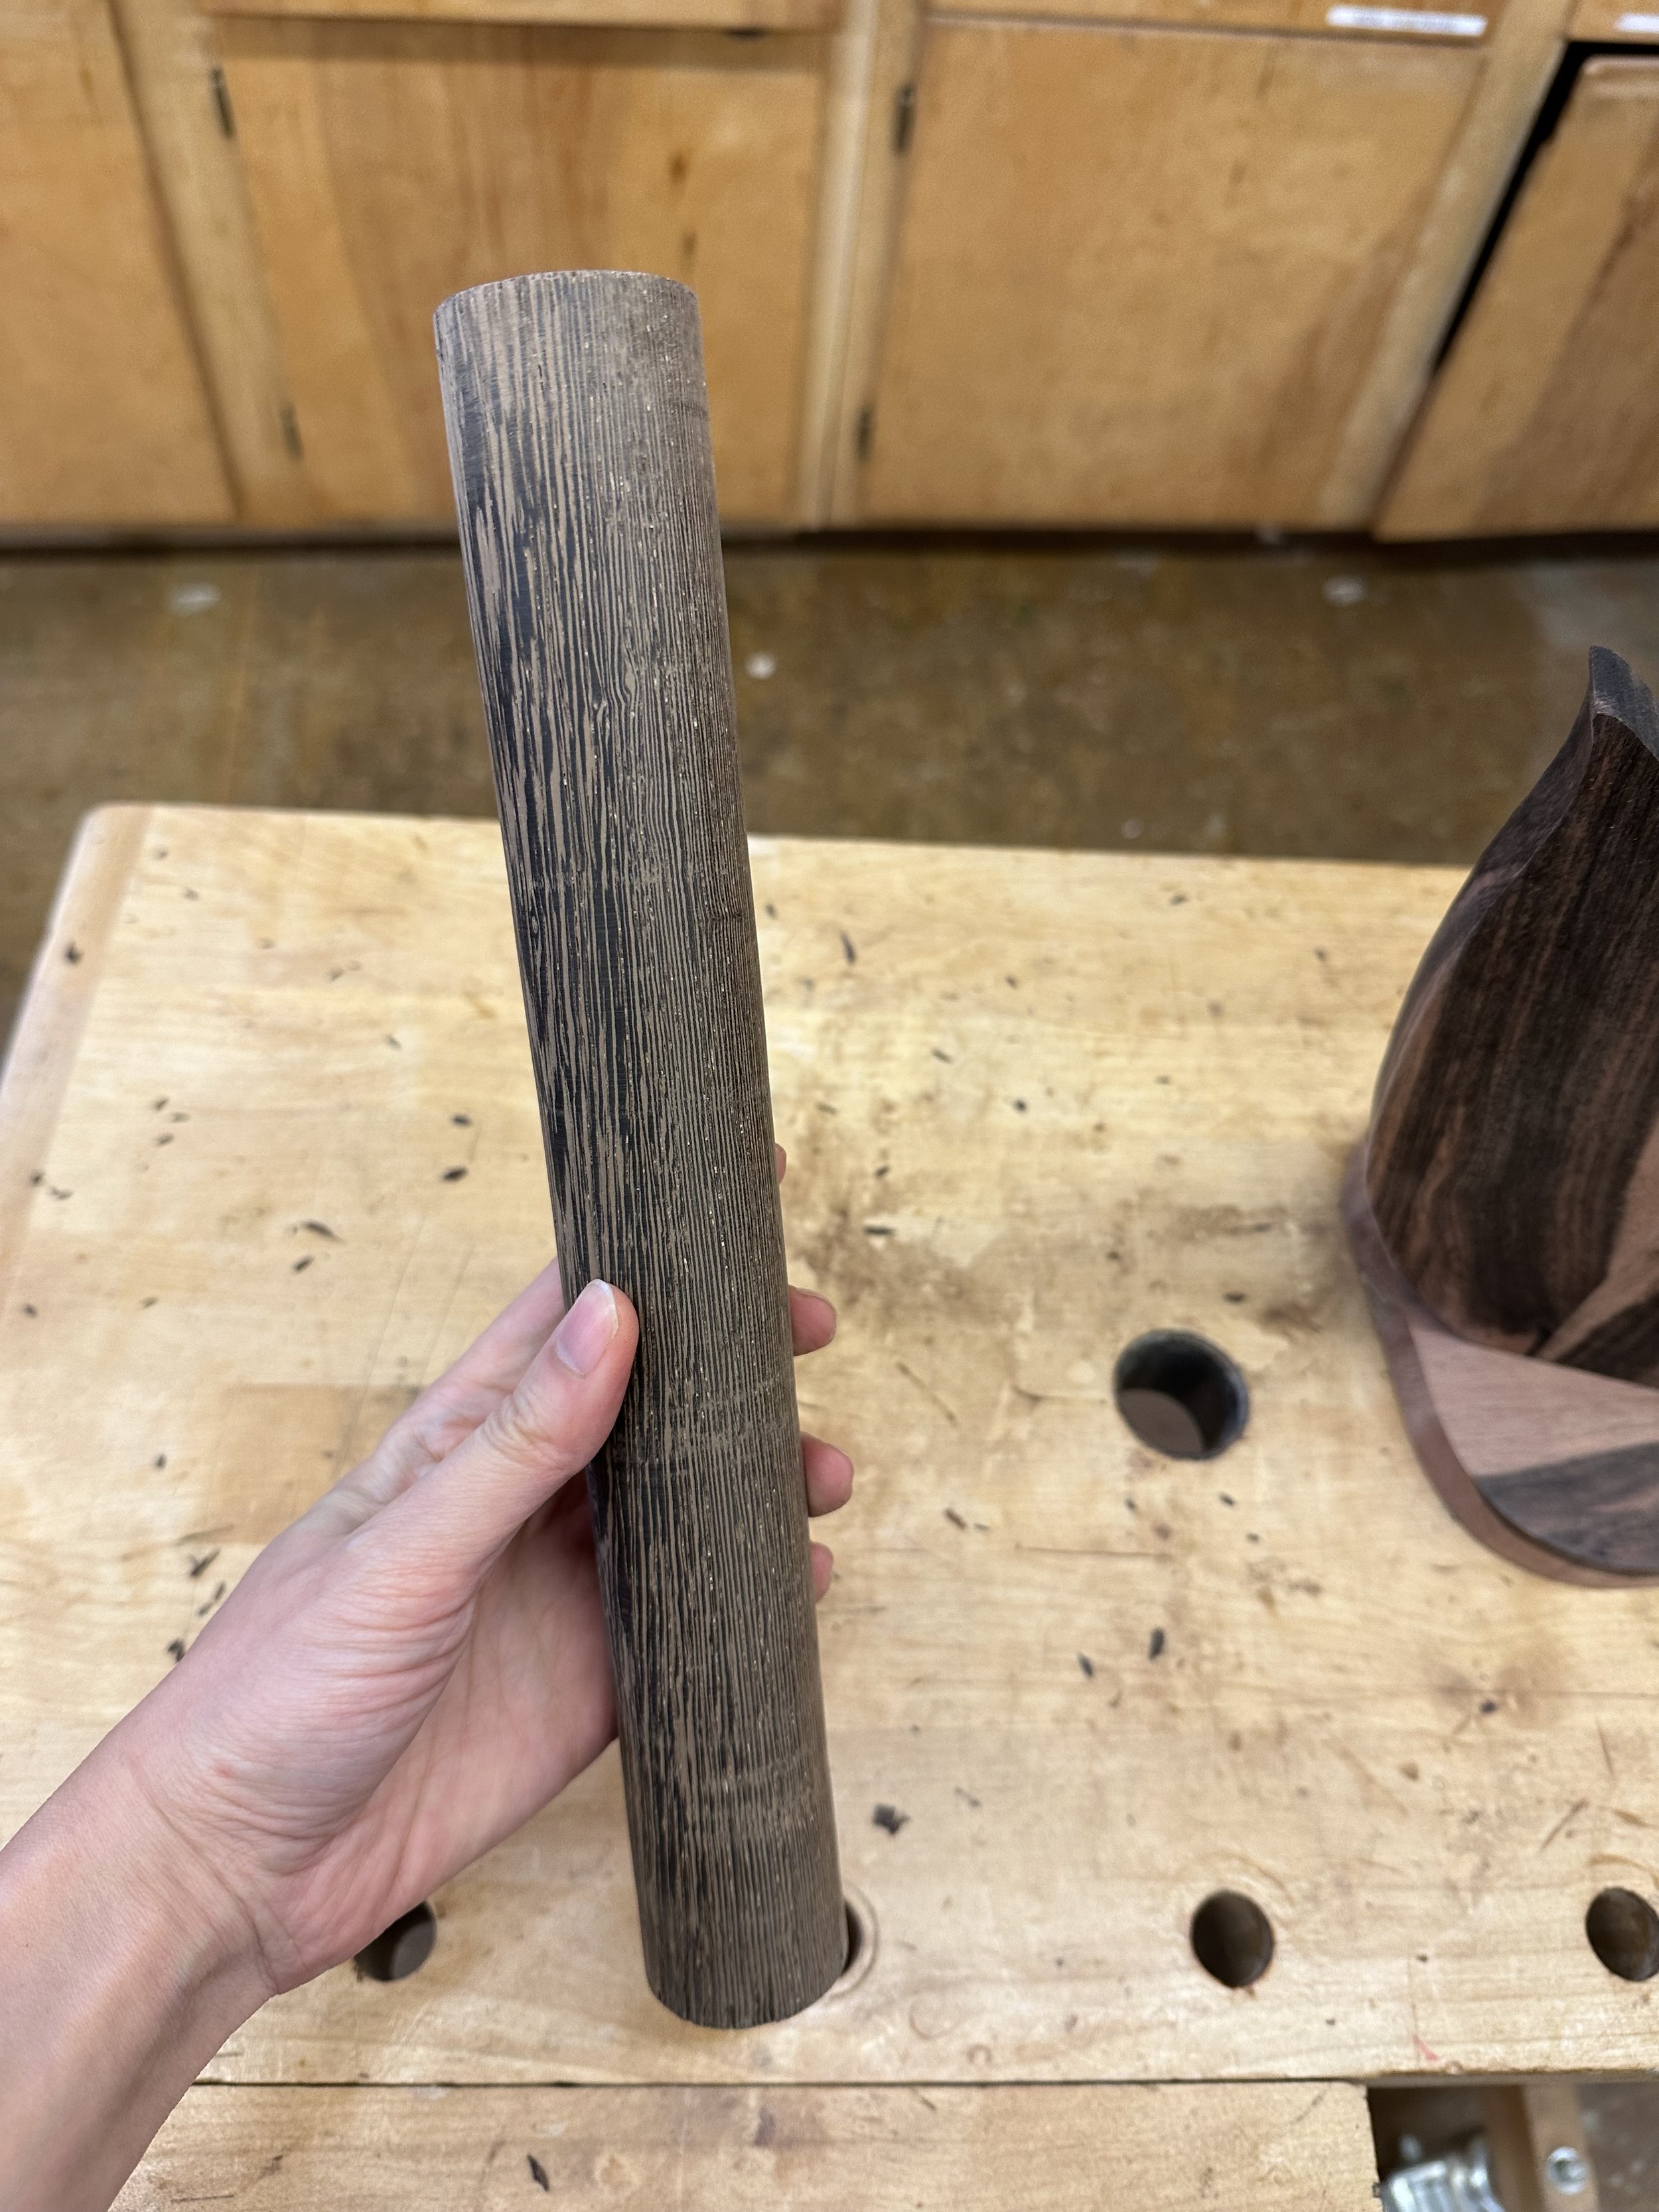

The cable channel that would run the wire up the lamp
Tulip Lamp
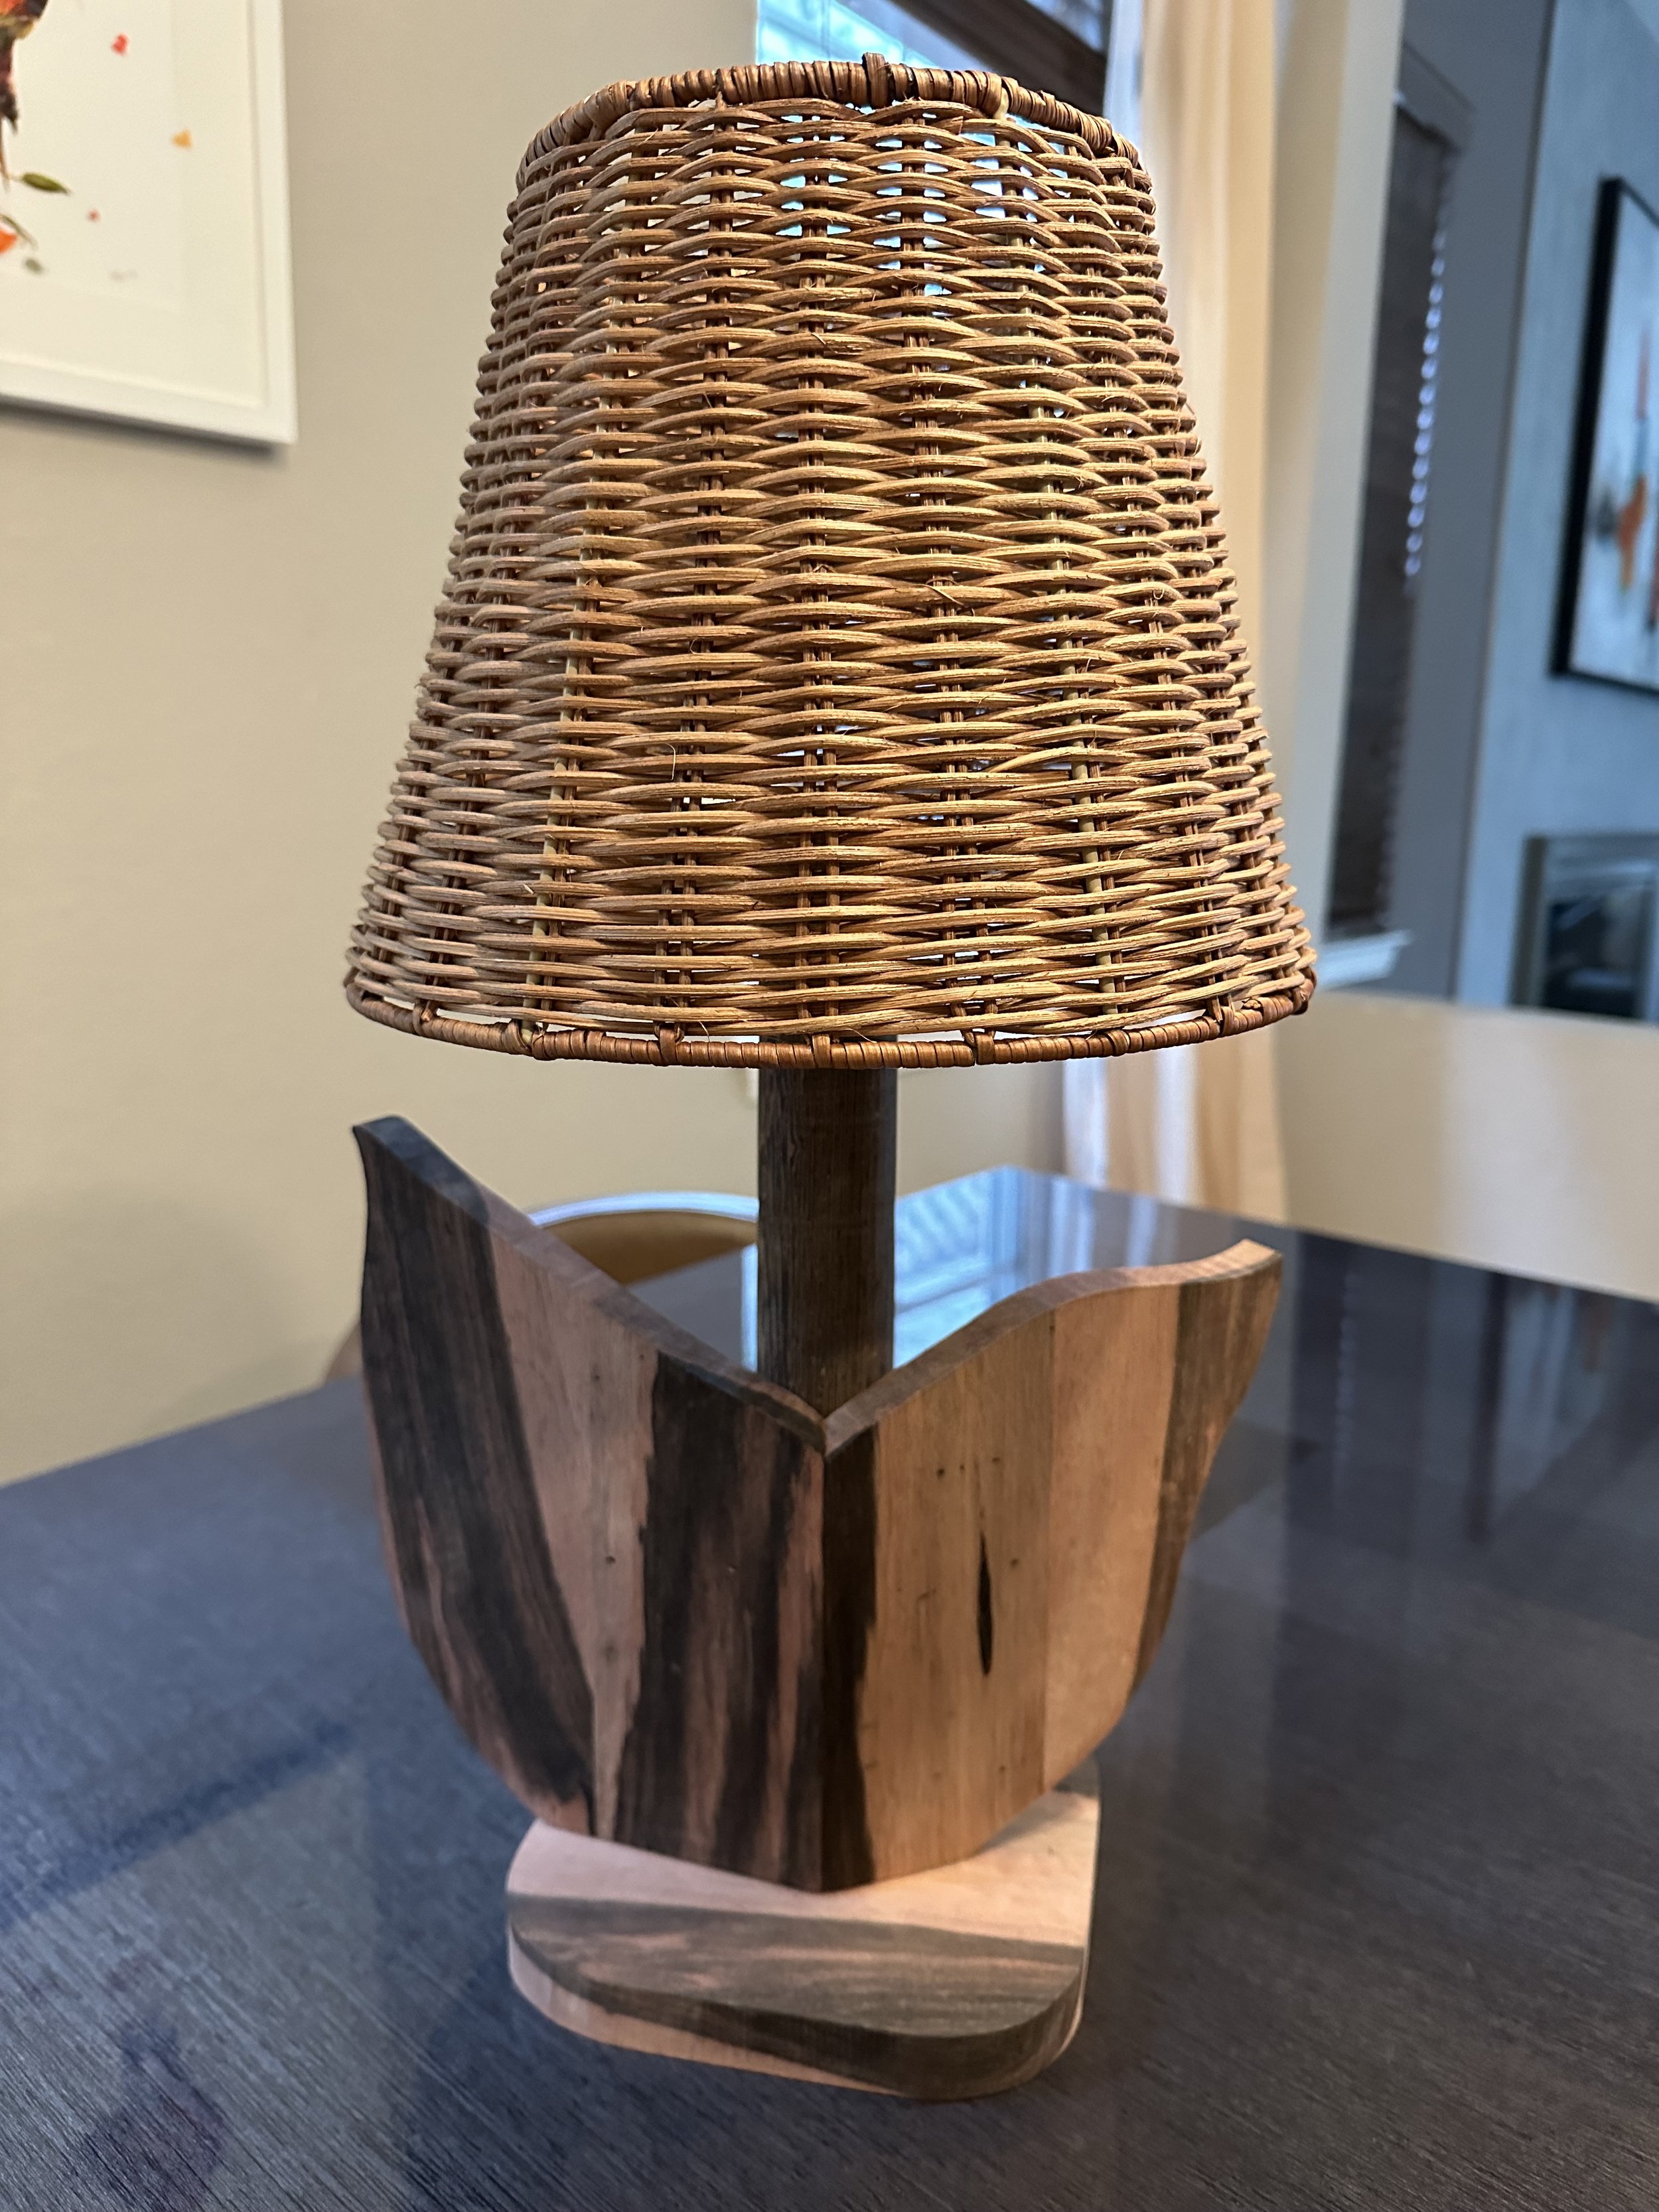
Tulip Lamp wired and turned on!